
A King's Revival Track Guide: Asphalt Legends Gauntlet (Cairo)
 1 Nitro: Standing start inside the tomb2 Ramp: The dune ramp and the 1.98-second double 3603 Drift: The 62-metre landing drift and the barrel-roll ramp at 29%4 Nitro: The boulevard held above 500 km/h and the hop at 41%5 Ramp: The right-hander at 57% and the downtown ramp at 62%6 Ramp: The traffic run-in and the Nile bridge jump at 90%
- 1. Standing start inside the tomb
- 2. The dune ramp and the 1.98-second double 360
- 3. The 62-metre landing drift and the barrel-roll ramp at 29%
- 4. The boulevard held above 500 km/h and the hop at 41%
- 5. The right-hander at 57% and the downtown ramp at 62%
- 6. The traffic run-in and the Nile bridge jump at 90%
What this track demands
The four big landings decide this lap. The reference car is above 500 km/h from 37% to the line, apart from the bridge approach, and every one of those numbers depends on coming down straight from the dune ramp, the street ramp, the downtown ramp and the bridge with the nitro still lit. Launch cleanly out of the tomb, come down from the double 360 pointed up the road, and keep the bar burning on the boulevard.
- Top speed
- 5
- Air and stunts
- 5
- Nitro
- 4
- Acceleration
- 3
- Handling
- 2
- Drift
- 2
The 30 seconds, beat by beat
The standing start inside the tomb
Standing start inside the tomb
A King's Revival launches from a dead stop inside a torch-lit tomb hall lined with clay pots, with the road running straight at a bright doorway. The reference run reads 37 km/h at 0.5 seconds still on 0%, 99 km/h at 1% and 128 km/h at 2% at 2.1 seconds. The nitro is lit by 3% reading 153 km/h, and the HUD shows OBSTACLES DESTROYED x3 at 4% as the car ploughs through the pots at 172 km/h. It reads 216 km/h at 8% as the doorway opens up, 231 km/h at 9% with 5.0 seconds gone on the stone ramp between the outer walls, and 266 km/h at 13% out on the sand.
The dune ramp and the 1.98-second double 360
The dune ramp and the 1.98-second double 360
The sand ends at a ramp built out of the ruins, and the reference run leaves it at 15% reading 265 km/h with 6.6 seconds on the clock. The HUD reads the car faster the longer it flies: 300 km/h at 17% with 0.58 seconds on the air counter, 349 km/h at 19% as the first 360 registers at 1.12 seconds, 379 km/h at 20% and 410 km/h at 22% with 1.88 seconds in the air and 360 SPIN x2 on the HUD. The counter stops at 1.98 seconds, the longest single flight of the lap, and the car is on the ground by 25% reading 415 km/h with 9.0 seconds gone and the slide already under way.
The 62-metre landing drift and the barrel-roll ramp at 29%
The 62-metre landing drift and the barrel-roll ramp at 29%
The landing is sideways, and the run turns it into a drift down a dusty boulevard lined with billboards: 32 metres on the drift counter at 25%, 51 metres at 27% reading 377 km/h, and 62 metres at 29% reading 372 km/h with 10.1 seconds on the clock, the slowest the car runs between the sand and the finish. The slide ends pointed at a red-and-white ramp, and the car is airborne again by 32% reading 410 km/h with 0.74 seconds on the counter. BARREL ROLL registers at 33% reading 441 km/h, the counter stops at 1.50 seconds as the car comes down by 36% reading 490 km/h, and it reads 509 km/h at 37% with 11.7 seconds gone.
The boulevard held above 500 km/h and the hop at 41%
The boulevard held above 500 km/h and the hop at 41%
From the landing the route is a wide, straight city boulevard, and the reference run never reads below 494 km/h again. It shows 510 km/h at 38% with 12.0 seconds on the clock and 511 km/h at 41%, where a low ramp in the carriageway lifts the car into a 0.85-second hop that reads 557 km/h at 44%, is down by 45%, and reads 531 km/h at 47% in a shower of sparks with a slide that reaches 37 metres by 50%. The run reads 554 km/h at 50% with 14.1 seconds gone, 560 km/h at 52%, 556 km/h at 53% and 540 km/h at 55%, nitro burning the whole way down the avenue.
The right-hander at 57% and the downtown ramp at 62%
The right-hander at 57% and the downtown ramp at 62%
The only corner that asks for a steering input comes at 57%, where the boulevard bends right past green chevrons and the reference run reads 530 km/h at 15.5 seconds with OBSTACLES DESTROYED x2 on the HUD. A small hop on the exit reads 555 km/h at 60%, then the big one: the car leaves a downtown ramp at about 62%, reads 554 km/h at 63% with 0.21 seconds on the air counter, 579 km/h at 69% and 71%, and shows BARREL ROLL x2 at 72% reading 559 km/h as the counter stops at 1.77 seconds. It is down by 72%, and reads 554 km/h at 74% in a cloud of dust at 18.4 seconds, straight through a wooden barrier.
The traffic run-in and the Nile bridge jump at 90%
The traffic run-in and the Nile bridge jump at 90%
The last quarter opens with traffic. The reference run reads 567 km/h at 77% at 19.0 seconds, 577 km/h at 80% with NEAR MISS on the HUD as it threads a car, 525 km/h at 86% with more traffic, and 494 km/h at 89% as it lines up a red-and-white ramp on the right of the carriageway. The car is in the air at 90% with 21.4 seconds gone, reads 530 km/h at 93% with 0.60 seconds on the counter, 561 km/h at 96% with 1.15 seconds and a barrel roll registered, and the counter stops at 1.62 seconds as the bridge deck arrives. The FINISH banner passes at 99% reading 562 km/h; the clock stops at 23.166.
Where the run is won
- The dune ramp landing at 25%. The reference run comes down from a 1.98-second double 360 by 25% reading 415 km/h and sideways, and the 62-metre drift that follows is what points the car at the barrel-roll ramp at 29%. A clean landing here is the difference between a 509 km/h entry to the boulevard at 37% and a lap spent catching up.
- Keeping the nitro lit from 37% to the line. The reference car reads between 494 and 579 km/h for the last 63% of the track, with three more flights in that stretch and a bar that refills off the barrel rolls and the drift. Every one of those numbers is a nitro number; a car that coasts the boulevard gives back most of what the launch and the first jump earned.
What wrecks a run
- A slow launch out of the tomb. The reference car needs 2.1 seconds to read 128 km/h and 5.0 seconds to reach 231 km/h at 9%, and the hall asks for nothing but throttle and the pots in the lane. A car that reaches the sand slowly leaves the dune ramp at 15% slowly, and the HUD reads every flight from the takeoff speed up.
- Landing the dune ramp crooked. The run's two 360s have registered by 22% and the car is down by 25% reading 415 km/h, with the 62-metre drift straightening it for the ramp at 29%. A landing that needs more than that slide to recover arrives at the street ramp slow and sideways, and the 1.50-second barrel roll reads from whatever speed is left.
- Lifting through the right-hander at 57%. The reference run takes the bend reading 530 km/h with the chevrons on the inside and is on the downtown ramp at 62% within a second. A lift here is carried into a 1.77-second flight that reads up to 579 km/h, and the lap arrives at the traffic at 77% behind the reference for the rest of the run.
- Missing the bridge ramp at 89%. The run drops from 577 km/h at 80% to 494 km/h at 89% threading traffic and lining up a ramp on the right of the carriageway, and the 1.62-second flight that follows carries it to 562 km/h at the line. Taking the bridge on the deck instead of over it turns the fastest finish on the lap into a drive through the barriers.
Which car to bring
Read this track the way our car stats guide suggests: count the places the layout forces you to slow down, then look at what it gives you back. A King's Revival forces it twice (the standing start inside the tomb and the 62-metre landing drift at 25%) and in return hands you five flights, a boulevard the reference car holds above 500 km/h from 37%, and a last quarter that reads between 494 and 579 km/h through traffic and over the Nile.
In priority order: top speed, because nearly two thirds of this lap is run above 500 km/h and the HUD reads every flight from the takeoff speed up, so a higher ceiling shows on the boulevard, the downtown ramp and the bridge at once. Air next, meaning a car that lands stable, because the reference run spends about 7.7 of its 23.2 seconds airborne across five flights and three of those landings are followed within a second or two by a drift, a ramp or a barrier. Nitro third, because the bar is what keeps the boulevard and the run-in above 500 km/h, and it refills off the barrel rolls and the drift on the way. Acceleration matters for the first 15%, where the run spends 6.6 seconds of a 23.2-second lap getting out of the tomb and across the sand. Handling barely matters: there is one real corner, at 57%, and the run takes it at 530 km/h.
The cited runs are the clearest evidence for that ordering. The fastest lap we found is 23.166 in a Bugatti Chiron, set by Harrison, and that is the run this guide was read from. A Lamborghini Centenario posts 23.6, a McLaren Speedtail 23.899 and an SSC Tuatara 24.433, with a McLaren P1 and a Rimac Nevera both just over 25 seconds. The spread across the hypercars is about two seconds on a 23-second lap, which says the launch, the landings and the nitro discipline are worth more than the badge, and that a free Daily Car Loot car sits about half a second off the best time we could find.
One consequence worth being straight about. Your Gauntlet division is set by the combined rank of your top five cars, and rank leans heavily on top speed, so a car that suits this track does not have to push your division up. The times attached to some picks are laps other players have posted, included so you can tell whether your own run is close. They are not targets, and none of them is a time we set.
Hyundai IONIQ 5 N
StarterClass D · Gauntlet Market, Division I
The cheapest car in the Gauntlet Market and the usual way into the mode at all. Its low rank keeps your division down, and its electric launch covers the one stretch of this track that is not about top speed: the 6.6 seconds the reference car spends getting out of the tomb and across the sand to the dune ramp. The five flights work the same at any class, because the HUD reads the car from its takeoff speed up.
Aston Martin DBS 770 Ultimate
StarterClass B · Gauntlet Market, Division II (900 blueprints)
The cheaper of the Division II market cars and a sensible first blueprint target if you are past the IONIQ. On this track the step up buys a higher number on the boulevard, where the reference car holds 510 to 560 km/h, and a quicker run to the dune ramp. Learn where the street ramp at 29%, the downtown ramp at 62% and the bridge ramp at 89% sit in it before spending on anything faster.
Lamborghini SC18
MidClass A · Gauntlet Market, Division III (2,100 blueprints)
A lot of nitro for a Class A car, which is what the back two thirds of this lap run on: the reference car is above 500 km/h from 37% to the line apart from the bridge approach, with the bar refilling off the barrel rolls and the drift. A car that fills faster keeps the boulevard lit for longer and still has a bar in hand for the traffic. The right mid-tier car for learning the lap.
Lamborghini Centenario LP 770-4
MidClass S · Daily Car Loot (beat 25s in a Class A car)
Reference run: 23.6 — Western Horizon reference run
A free blueprint car with a Class S top end, and the second-fastest cited lap on this track, about half a second behind the reference Chiron. The Centenario has the ceiling for the boulevard and the bridge and enough nitro to keep both lit, and the Daily Car Loot route to it runs on 30-second tracks like this one. The strongest argument on this page that the earnable cars are enough here.
Rimac Nevera
HighReference run: 25.299 — Crazypan reference run
The slowest cited lap on this track, 2.1 seconds behind the reference Chiron. Included as the floor of the cited field: on a layout where the reference car never reads below 494 km/h after 37%, the gap between the fastest and slowest hypercar laps we found is about two seconds, and that gap lives in the launch and the four big landings.
McLaren P1
HighReference run: 25.166 — QuanTheAznPoop reference run
Two seconds off the reference Chiron, at the slow end of the cited field. Two seconds on this layout is roughly one full flight, which is the gap between a lap that comes down straight from the dune ramp, the street ramp, the downtown ramp and the bridge and one that does not.
SSC Tuatara
HighReference run: 24.433 — Asphalt Academy reference run
A lap 1.3 seconds behind the reference Chiron, in the middle of the cited field. On a track where the reference car is above 500 km/h from 37% to the line, that gap is the size of a launch out of the tomb and one or two landings, and it is the clearest marker on this page of what a clean run in a top-end car is worth.
McLaren Speedtail
HighReference run: 23.899 — QuanTheAznPoop reference run
The third-fastest cited lap on this track, 0.7 seconds behind the reference Chiron and 0.3 behind the Centenario. Seven tenths on this layout is less than half of one of the big flights, so the Speedtail run and the Chiron run are separated by the launch out of the tomb and the landings rather than by anything on the boulevard.
Bugatti Chiron
HighNot sold in the Gauntlet Market
Reference run: 23.166 — Harrison reference run
The fastest lap we found on this track and the run this guide was read from: 231 km/h at 9% out of the tomb, a 1.98-second double 360 off the dune ramp that is down by 25% at 415 km/h, a 62-metre drift, a 1.50-second barrel roll down by 36% and reading 509 km/h at 37%, a boulevard held between 510 and 560 km/h, a 1.77-second double barrel roll reading 579 km/h and a 1.62-second bridge jump that comes down at the line. The Chiron has the ceiling this track rewards first and the nitro to hold it.
These are examples of the profile, not a ranked list. The method behind them is in how Asphalt Legends car stats actually work.
Frequently Asked Questions
- How long is A King's Revival in Asphalt Legends?
- It is one of the two 30-second (30") Cairo variations used in Gauntlet, alongside Gezira Island, which starts where this track finishes. The reference runs we cite finish it in 23.166 to 25.299 seconds, and in the fastest of them about 7.7 seconds are spent in the air across five flights.
- Where is A King's Revival won and lost?
- On the landings and on the nitro. The reference run comes down from a 1.98-second double 360 by 25% reading 415 km/h and uses a 62-metre drift to point the car at the next ramp, and from 37% it never reads below 494 km/h again. A crooked landing off the dune ramp, the street ramp, the downtown ramp or the bridge costs speed the boulevard cannot give back.
- What kind of car is best for A King's Revival?
- Top speed first, a stable lander second, nitro third. Nearly two thirds of the lap is run above 500 km/h, five flights are read from the takeoff speed up, and the bar is what holds the boulevard and the traffic run-in at that number. The fastest cited lap was set in a Bugatti Chiron, and a free Daily Car Loot Lamborghini Centenario sits about half a second behind it.
- How many jumps are there on A King's Revival?
- Five that register more than three quarters of a second on the air counter in the reference run: the dune ramp at 15% (1.98 seconds, two 360 spins), the street ramp at 29% (1.50 seconds, a barrel roll), a hop on the boulevard at 41% (0.85 seconds), the downtown ramp at 62% (1.77 seconds, two barrel rolls) and the bridge at 90% (1.62 seconds, a barrel roll). There are several shorter hops between them.
- Where does A King's Revival start and finish?
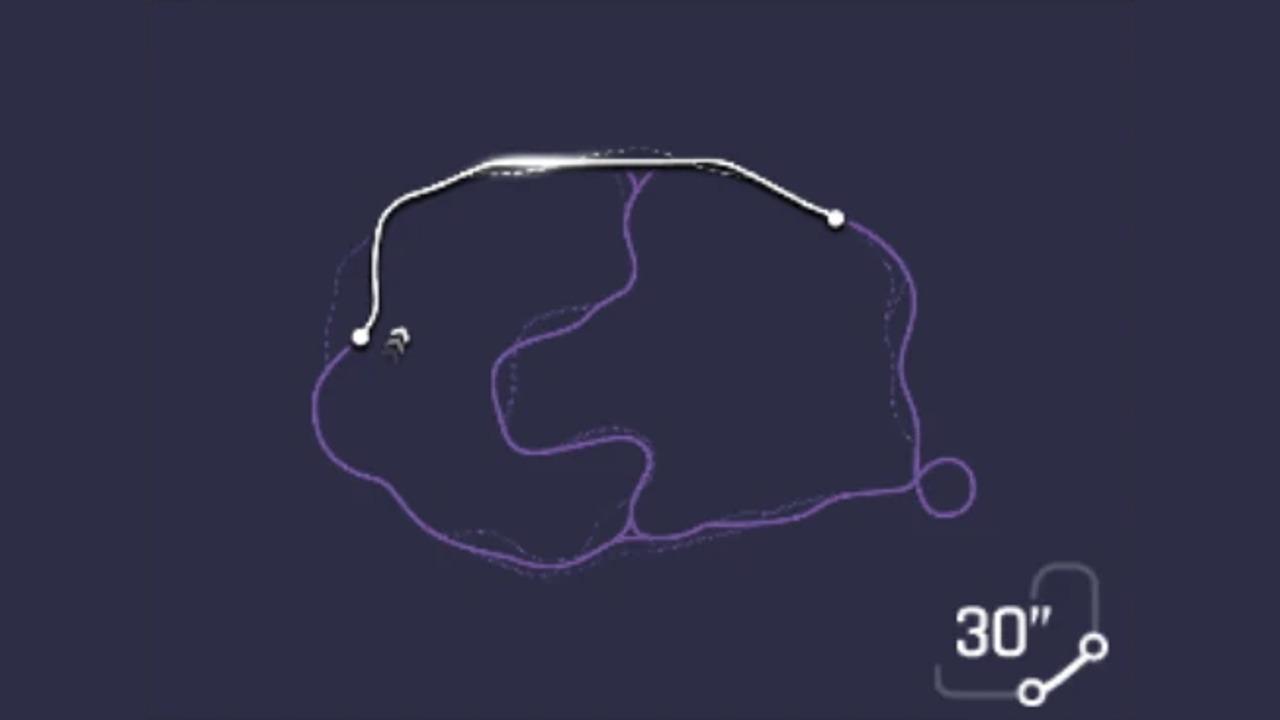
- It starts from a standing stop inside a tomb on the western edge of the Cairo map, at the dot beside the direction chevrons on the route card, climbs north out onto the sand, turns east along a city boulevard and finishes on the far side of a bridge over the Nile on the right of the card. The Gezira Island variation opens on that same mosque-lined boulevard and bridge.
- How many drifts are there on A King's Revival?
- One that matters: the 62-metre slide from 25% to 29% after the dune ramp landing, which drops the reference car from 415 km/h to 372 km/h and lines it up for the street ramp. The rest of the lap registers only short slides, a 37-metre one after the boulevard hop at 50% and a 19-metre one at 77%, and the only real corner, at 57%, is taken at 530 km/h without a drift.
- Can you get a good time on A King's Revival with an earnable car?
- Yes, and this track is one of the better arguments for it. The Lamborghini Centenario LP 770-4, a Daily Car Loot blueprint car, posts 23.6 in a cited run against the 23.166 reference in a Bugatti Chiron. Below that the Gauntlet Market ladder is the route: the Hyundai IONIQ 5 N at Division I, the Aston Martin DBS 770 Ultimate at Division II and the Lamborghini SC18 at Division III, each buying a higher number on the boulevard and the same five flights.
Sources
- Asphalt Wiki - A King's Revival route card
- Asphalt Wiki - Gauntlet (format, divisions, Gauntlet Market)
- Reference run - Bugatti Chiron, 23.166 (Harrison)
- Reference run - A King's Revival and Gezira Island in the Bugatti Chiron (RedNycto), used to confirm the direction of the route card
- Reference run - Lamborghini Centenario, 23.6 (Western Horizon)
- Reference run - McLaren Speedtail, 23.899 (QuanTheAznPoop)
- Reference run - SSC Tuatara, 24.433 (Asphalt Academy)
- Reference run - McLaren P1, 25.166 (QuanTheAznPoop)
- Reference run - Rimac Nevera, 25.299 (Crazypan)