
Riverine Launch Track Guide: Asphalt Legends Gauntlet (Tuscany)
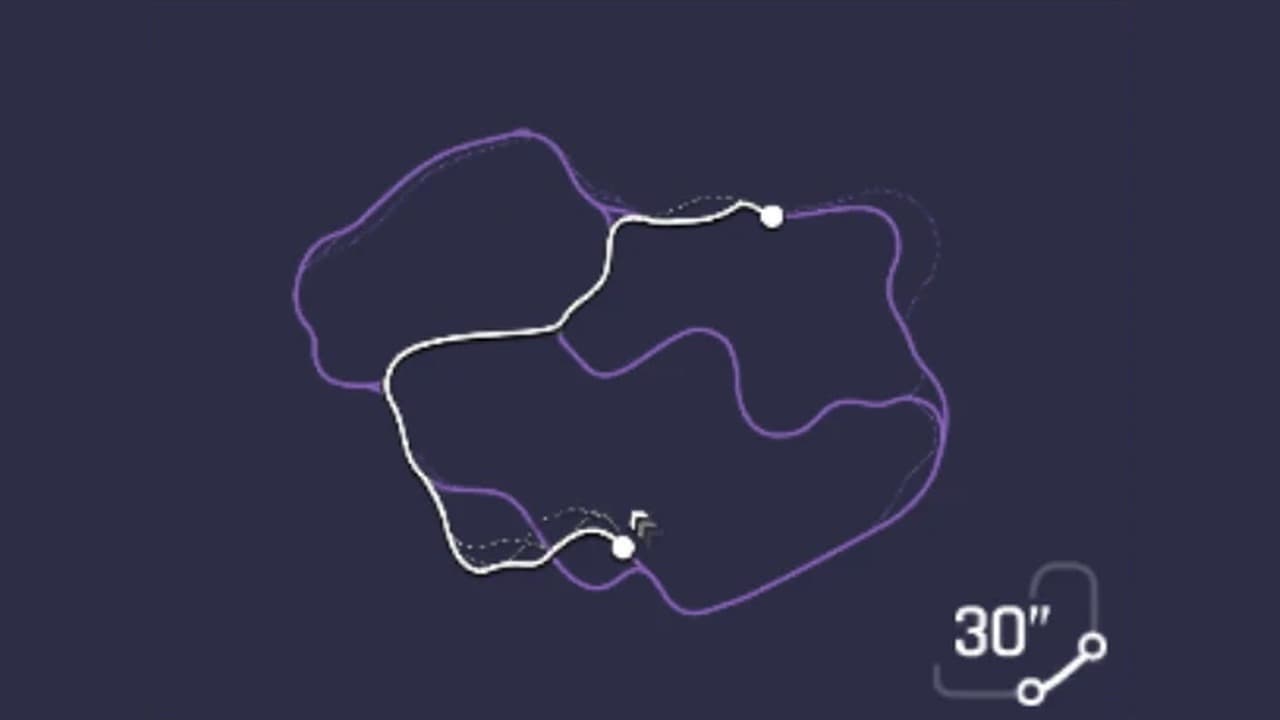 1 Nitro: Standing start, in the riverbed2 Drift: River drift section3 Ramp: The launch ramp out of the river4 Hazard: Landing and the stone arch5 Nitro: The cypress straight6 Hazard: The portico of destructibles
- 1. Standing start, in the riverbed
- 2. River drift section
- 3. The launch ramp out of the river
- 4. Landing and the stone arch
- 5. The cypress straight
- 6. The portico of destructibles
What this track demands
The riverbed takes ten of your thirty seconds and gives back less than a third of the distance. What decides this track is not how fast your car is on the open road afterwards — it is what you arrive at the ramp carrying.
- Acceleration
- 5
- Nitro
- 5
- Top speed
- 4
- Drift
- 4
- Air and stunts
- 3
- Handling
- 2
The 30 seconds, beat by beat
The standing start, in the water
Standing start, in the riverbed
Gauntlet drops you from a dead stop into the riverbed rather than onto tarmac, and the low-grip launch is slow even in the fastest cars — reference runs are still under 200 km/h three seconds in, with only 4% of the track behind them. You have no nitro to spend yet, so there is nothing to manage: get the launch clean and take the nitro bottles strung along the bank. Every one of them is a deposit on the second half of the lap.
Drift the river, do not straighten it
River drift section
The riverbed reads like a straight on the map and races like a wide, greasy sweeper. Fast runs reach the ramp with 150 to 200 metres of drift banked, and that is the entire point: drifting refills nitro, and you want a full bar before the launch. Resist the urge to burn boost here to feel quick. Spending nitro in the water gets you to marker 3 a fraction sooner and arrives with nothing, which costs far more over the long, fast back half than it ever gains you in the river.
Hit the ramp with a shockwave already running
The launch ramp out of the river
This is the lap. Around a third of the distance in, the riverbed banks into a chevron-marked ramp and throws you into the air. Every fast reference run crosses it with a nitro shockwave already lit — not a perfect nitro, a shockwave. The difference is not subtle: runs that hit it flat come down around 380 km/h, runs that hit it lit come down past 500. The back half is a speed section, so that gap does not close. You spend the rest of the lap either using it or chasing it.
Land straight, then take the arch flat
Landing and the stone arch
You are airborne for well over a second and the car banks two or three 360 spins while you are up there, which is free nitro on touchdown. What the air costs you is direction. Land crooked and you scrub speed at exactly the point the track stops being technical and starts being fast. Aim the nose down the road before you touch down, then run the stone arch without lifting. From here to the finish, the track stops asking about car control and starts asking how much speed you brought out of the river.
The cypress straight
The cypress straight
The quickest stretch of the lap, and the one that pays back everything you banked. Reference runs sit between 500 and 555 km/h through the tree-lined road on shockwave, and it is wide enough that handling all but stops mattering. Your only job here is nitro sequencing: keep the chain alive, take the bottles on the racing line, and do not dump a shockwave early on a section you would have covered at speed anyway. Done properly, you run this whole stretch lit.
The portico, and why you must not lift
The portico of destructibles
The last tenth of the track runs through a covered portico packed with crates and barriers. They look like walls. They are not — fast runs exit having destroyed seven to nine obstacles with no meaningful speed loss, and the destruction feeds nitro rather than draining it. Braking here is the most common way to hand back the time the ramp won you. Hold the line, stay lit, and let the scenery lose. The road opens into the village square and the finish line immediately after.
Where the run is won
- Arrive at the ramp (marker 3) with a nitro shockwave already running. Nothing else on this track moves the clock nearly as much.
- Bank drift in the riverbed instead of spending nitro there. The first ten seconds are only worth about 30% of the distance, but they pay for the 70% that follows.
What wrecks a run
- Burning nitro through the river to feel fast. You reach the ramp with an empty bar and spend the entire back half behind a car that did not.
- Treating the riverbed as a straight. It is wide and it is slippery, and it is where your drift meter — and therefore your nitro — gets built.
- Landing crooked off the launch. The road after the stone arch is the fastest part of the lap, and you only get to use it if you are already pointing down it.
- Lifting in the portico near the finish. The crates are destructible and breaking them feeds nitro; braking for them gives back the time you won at the ramp.
Which car to bring
Read this track the way our car stats guide suggests: count how often the layout forces you to slow down. Riverine Launch forces it once, hard — a standing start on water — and then hands you roughly twenty seconds of open road. That points straight at acceleration and nitro, and it points away from handling.
In priority order: acceleration first, because you start from rest on a low-grip surface and the opening ten seconds buy you less than a third of the track. Nitro efficiency second, because the back half is run on shockwave and a car that rebuilds its bar quickly gets to stay lit through the cypress straight. Drift retention third, since the river is where that nitro is earned. Handling is the stat you can afford to skip here — the riverbed and the roads after it are wide, and some of the quickest runs on this track come from cars with famously poor cornering.
One thing specific to Gauntlet: your division is set by the combined rank of your top five cars, and rank leans heavily on top speed. A car with modest top speed but strong acceleration and nitro is therefore doing you two favours at once — it suits this track, and it keeps your combined rank, and so the opposition you are matched against, lower than a hypercar would.
That is why the list below starts with cars you do not have to buy. Most of it is free or earnable: the Class D cars come out of early Career and class packs, four of the picks are Daily Car Loot blueprint cars that arrive one a day for clearing a short lap, and the Gauntlet Market cars are bought with currency the mode itself pays you. Daily Car Loot even runs on 30" variant tracks, so grinding the free cars is practice for the mode you are grinding them for. The reference times attached to a few picks are runs other players have posted, included so you can tell whether your own lap is close — they are not targets, and none of them is a time we set.
DS Automobiles DS E-TENSE
StarterClass D · Class D packs and early Career
The free-to-play answer to this track. Its top speed is only 250 km/h, but its nitro efficiency is excellent and it is famously easy to drive, which is the combination the riverbed rewards. A car this cheap to star up is also almost free in rank terms, so it never pushes your division up.
Ford Shelby GT350R
StarterClass D · Class D packs and early Career
The friendliest Class D car we recommend elsewhere, and the reason it works here is the same reason it works for beginners: strong acceleration with forgiving handling. Acceleration is the stat this track leans on hardest, and the wide riverbed forgives the rest.
Hyundai IONIQ 5 N
StarterClass D · Gauntlet Market, Division I
The best accelerating car in Class D and the cheapest thing in the Gauntlet Market. Its low top speed is a feature rather than a flaw: it launches hard out of the water, and it keeps your combined rank — and therefore your division — down while it does it.
Dodge Challenger SRT8
StarterClass D · Daily Car Loot (beat 30s in a Class D car)
Worth naming because it costs nothing but daily play — Daily Car Loot hands out a blueprint every day, and it runs on 30" variant tracks, so grinding it is also practice for exactly this kind of run. Treat it as the car that gets you into Gauntlet at all rather than the one you set your best time in.
Aston Martin Vulcan
MidClass B · Daily Car Loot (beat 27s in a Class B car)
The free mid-tier rung. Nothing here needs to be bought: the blueprints arrive a day at a time for clearing a 30-second lap, which is the same skill the guide above is teaching. A sensible bridge while you are collecting for a Class A or S car.
Lamborghini SC18
MidClass A · Gauntlet Market, Division III
Strong nitro efficiency paired with sharp drifting, which is exactly the pair this track pays for. It rebuilds its bar quickly after the river drifts, and that is what lets you run the cypress straight lit rather than coasting half of it.
Lamborghini Centenario LP 770-4
MidClass S · Daily Car Loot (beat 25s in a Class A car)
The best value on this list if you are patient: a Class S car earned one free blueprint at a time. Maxed, it pairs extremely fast acceleration and strong nitro efficiency with weak handling — a stat spread that would hurt on a technical track and costs you almost nothing on this one.
FV Frangivento GT65
MidReference run: 27.433 — Gauntlet practice run
A useful calibration point rather than a recommendation: the reference time below was set at only two stars, which shows how much of this track is driving rather than rank. If you are well off that pace in a stronger car, the problem is the ramp, not the garage.
Ultima RS
HighClass S · Gauntlet Market, Division IV
Reference run: 24.499 — QuanTheAznPoop reference run
The profile match at the top of the earnable range: excellent acceleration with good drift retention and a high total top speed for the back half. Bought with Gauntlet currency by playing the mode rather than gambled for in packs.
Devel Sixteen
HighClass S · Gauntlet Market (Division V, pre-Touge Masters roster)
Reference run: 23.299 — demon reference run
The quickest time we could find on this track, which is worth understanding rather than copying: the Devel has the highest top speed in the game and punishing handling, and this layout barely asks a handling question. It is the clearest evidence that handling is the stat you can skip here.
These are examples of the profile, not a ranked list. The method behind them is in how Asphalt Legends car stats actually work.
Frequently Asked Questions
- How long is Riverine Launch in Asphalt Legends?
- It is one of the 30-second (30") Tuscany variations used in Gauntlet. Competitive reference runs finish it in roughly 23 to 25 seconds depending on the car. It is not available in Career mode.
- Where is the hardest part of Riverine Launch?
- The riverbed at the start. It takes about ten seconds and covers less than a third of the track, and it is where you have to build the nitro you need for the ramp. The rest of the lap is fast and relatively forgiving.
- What is the most important thing to get right on Riverine Launch?
- Reaching the launch ramp about a third of the way in with a nitro shockwave already running. Runs that hit the ramp flat land around 380 km/h; runs that hit it lit land past 500 km/h, and the back half is too fast for that gap to close.
- What kind of car is best for Riverine Launch?
- Acceleration and nitro efficiency matter most, with drift retention close behind. Handling matters least, because the riverbed and the roads after it are wide. A car with modest top speed but strong acceleration also keeps your combined rank lower, which keeps you in an easier Gauntlet division.
- Can you do Riverine Launch well with a free car?
- Yes, and the free cars fit this track unusually well. The DS E-TENSE is a Class D car from early Career and class packs with excellent nitro efficiency and a low top speed, which is exactly the profile here. Daily Car Loot also hands out a blueprint a day for cars including the Dodge Challenger SRT8, the Aston Martin Vulcan and the Class S Lamborghini Centenario, and it runs on 30-second variant tracks, so earning them doubles as practice.
- What is a good time on Riverine Launch?
- Posted reference runs range from 23.299 in a Devel Sixteen down to 27.433 in a two-star FV Frangivento GT65, with strong hypercar runs clustering around 24.0 to 24.5. Those are other players' laps rather than targets, but the spread is useful: the two-star run shows how much of this track is driving rather than garage.
- Do you have to slow down for the crates near the finish?
- No. The obstacles in the covered portico at the end are destructible, and breaking them feeds nitro. Reference runs destroy seven to nine of them without losing meaningful speed. Braking for them is a common way to lose the time the ramp gained.
Sources
- Asphalt Wiki — Tuscany (track variants and route maps)
- Asphalt Wiki — Gauntlet (format, divisions, Gauntlet Market)
- Reference run — Ultima RS and McLaren Speedtail (QuanTheAznPoop)
- Reference run — Devel Sixteen (demon)
- Asphalt Wiki — Daily Car Loot (the free blueprint cars and their lap conditions)
- Asphalt Wiki — DS E-TENSE stats
- Asphalt Wiki — Hyundai IONIQ 5 N stats
- Asphalt Wiki — Lamborghini SC18 stats
- Asphalt Wiki — Lamborghini Centenario LP 770-4 stats
- Asphalt Legends Unite Database — Ultima RS