
Roman Tumble Track Guide: Asphalt Legends Gauntlet (Rome)
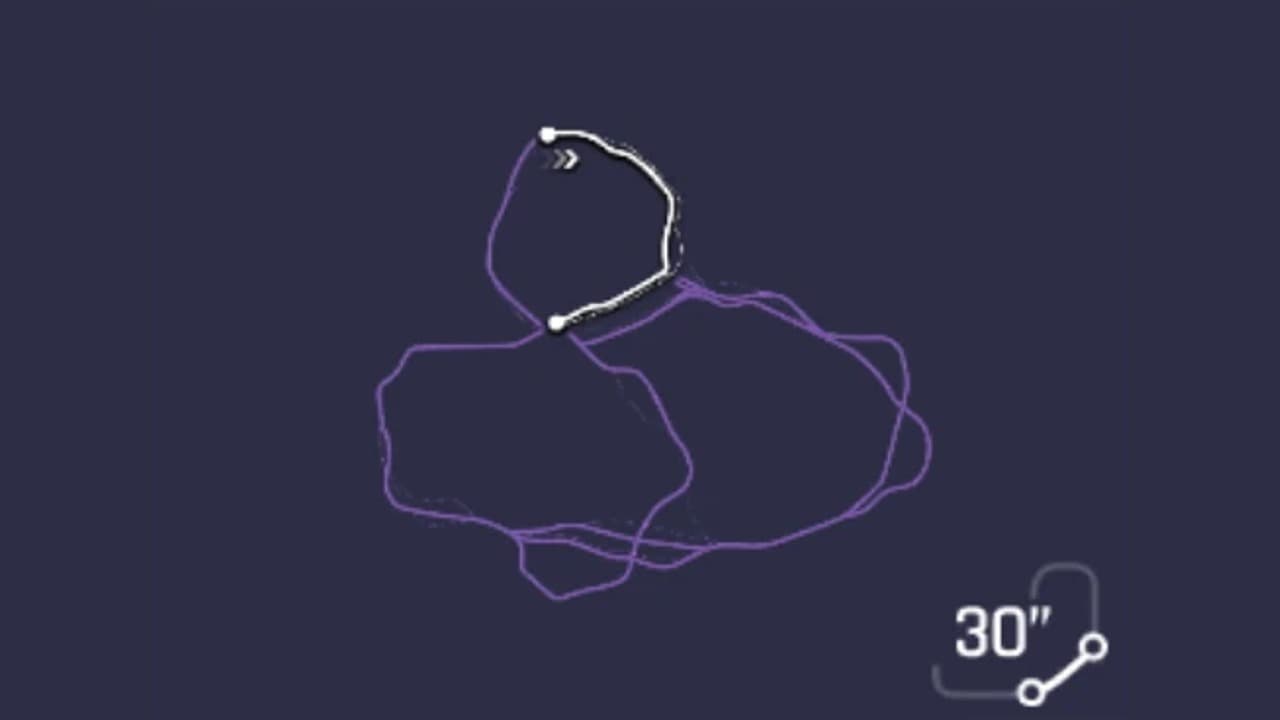 1 Hazard: Standing start on the city street2 Ramp: The ramp and the 1.89-second double barrel roll3 Ramp: The second hop over the embankment4 Drift: The 85-metre riverside drift5 Drift: The 99-metre chevron corner6 Nitro: The nitro run to the line
- 1. Standing start on the city street
- 2. The ramp and the 1.89-second double barrel roll
- 3. The second hop over the embankment
- 4. The 85-metre riverside drift
- 5. The 99-metre chevron corner
- 6. The nitro run to the line
What this track demands
One ramp and one corner decide this lap. The 1.89-second double barrel roll at 14% sets the speed of the whole first half and fills the nitro bar, and the 99-metre chevron corner at 60% sets the speed the car carries into a final third that is nothing but a straight. Get to the ramp fast, land it straight, and exit the chevrons above 375 km/h.
- Top speed
- 4
- Acceleration
- 4
- Nitro
- 4
- Air and stunts
- 4
- Handling
- 3
- Drift
- 3
The 30 seconds, beat by beat
The standing start on the city street
Standing start on the city street
Roman Tumble launches from a dead stop on a city street lined with red and white barriers, with a bus parked on the right. The reference run reads 24 km/h at 0.4 seconds, 58 km/h at 0.9 seconds still on 0%, 103 km/h at 1% and 153 km/h at 3%. The road runs past the barriers and the lamp posts and sweeps gently toward the ramp, and the run reads 200 km/h at 7%, 233 km/h at 11% and 266 km/h at 14% with 5.2 seconds on the clock. Nothing here asks for much steering; the launch sets the speed the car carries onto the lip.
The ramp and the 1.89-second double barrel roll
The ramp and the 1.89-second double barrel roll
At 14% the road ends in a ramp and the reference run leaves it reading 270 km/h at 5.7 seconds. The game reads the car faster the longer it flies: 285 km/h with 0.43 seconds on the air counter, 308 km/h at 0.72 seconds, 331 km/h at 16% as the first barrel roll registers, 357 at 17%, 391 at 18% and 439 km/h at 20% with 1.65 seconds in the air. The counter stops at 1.89 seconds and the car comes down at 27% reading 509 km/h with two barrel rolls on the HUD, 7.4 seconds into the lap. That one flight covers thirteen percent of the track.
The second hop over the embankment
The second hop over the embankment
The landing is not the end of the airborne section. The run reads 451 km/h at 28% with a 35-metre slide on touchdown, then the road drops away again and the car is back in the air reading 444 km/h at 7.9 seconds. It reads 474 km/h at 32%, 509 at 34% and 548 km/h at 36% before the air counter stops at 0.88 seconds, and it lands at 38% reading 544 km/h. From there it rolls onto the riverside reading 524 km/h at 39% and 478 km/h at 42%, with the clock at 9.4 seconds.
The 85-metre riverside drift
The 85-metre riverside drift
The first real corner comes at 42%, where the route turns to follow the river behind a railing. The reference run starts sliding at 42% reading 478 km/h, has 41 metres of drift at 43%, 68 metres at 45% reading 453 km/h and 85 metres at 47% reading 419 km/h, the slowest the car runs between the start and the chevron corner. It straightens at 49% reading 422 km/h and holds 419 to 435 km/h along the riverside straight from 50% to 59%, with only 4 and 5 metre corrections on the HUD and the clock reading 11.9 seconds at 59%.
The 99-metre chevron corner
The 99-metre chevron corner
At 60% a second drift starts reading 412 km/h, and this one is the slow point of the lap. The run reads 401 km/h with 43 metres of drift at 63%, knocks down two obstacles at 64% reading 375 km/h, and keeps sliding: 80 metres at 66% reading 344 km/h, 96 metres at 67% reading 333 km/h, and 99 metres from 69% through 72%, where the speed climbs back from 336 to 375 km/h. The clock reads 12.3 seconds at the entry and 13.9 at 72%. Everything from here to the line is a straight, so the exit speed sets the whole final third.
The nitro run to the line
The nitro run to the line
From 73% the reference run fires nitro along the river and the HUD climbs almost without interruption: 388 km/h at 73%, 404 at 75%, 463 at 78%, 505 at 80%, 552 at 82% and 569 km/h at 84% with 15.7 seconds on the clock. It dips to 548 km/h at 87% as the road passes the castle walls, reads 569 km/h again at 91%, 556 at 94% and 528 km/h at 96% under the finish banners, and crosses the line at 99% reading 559 km/h with 17.607 on the clock. The last 27% of the track take 3.9 seconds.
Where the run is won
- The ramp at 14%. The reference run reaches it reading 270 km/h after a 5.7-second standing start, flies for 1.89 seconds with two barrel rolls and lands at 27% reading 509 km/h. Every km/h missing at the lip is missing from the whole flight, and the two barrel rolls are where the nitro for the rest of the lap comes from.
- The chevron corner from 60% to 72%. The run drops to 333 km/h in a 99-metre slide and exits reading 375 km/h at 72%. The remaining 27% is a nitro straight the run covers in 3.9 seconds, so the exit speed here is the speed of the entire final third.
What wrecks a run
- Reaching the ramp slow. The run needs 5.2 seconds to read 266 km/h at 14%, and the game reads the flight from the takeoff speed up. A slow launch or a scrub on the sweep before the lip shortens the 1.89-second flight and lands the car short of 509 km/h.
- Landing the barrel roll crooked at 27%. The run comes down at 509 km/h and is airborne again within half a second for the 0.88-second hop at 28%. A sideways landing turns the 35-metre touchdown slide into a tap on the embankment, and the second hop is taken slower.
- Over-rotating the riverside drift at 42%. The run holds 419 to 422 km/h through the 85-metre slide and exits onto a ten-percent straight it covers at around 430 km/h. A drift that runs wide here is paid for all the way to 59%.
- Over-driving the chevron corner at 60%. The reference run slides 99 metres and falls to 333 km/h by 67% even with a clean line, and only reads 375 km/h again at 72%. A run that scrubs more exits below that, and the nitro run to 569 km/h starts from a lower number and later.
Which car to bring
Read this track the way our car stats guide suggests: count the places the layout forces you to slow down, then look at what it gives you back. Roman Tumble forces it three times (the standing start, the 85-metre drift at 42% and the 99-metre chevron corner at 60%) and in return hands you a 1.89-second double barrel roll that lands at 509 km/h, a second 0.88-second hop straight after it, and a final 27% that is a nitro straight the reference car covers at up to 569 km/h.
In priority order: air, meaning a car that lands stable and straight, because the ramp at 14% lands into a touchdown slide and a second hop within half a second, and a crooked landing costs the whole run to 42%. Nitro next, because the two barrel rolls fill the bar and the lap spends its last 27% burning it, from 388 km/h at 73% to 569 km/h at 84%. Top speed and acceleration share third: the run holds 548 to 569 km/h for the last fifteen percent, and the standing start takes 5.2 seconds to reach 266 km/h. Handling and drift matter at 42% and 60%, where the car slides 85 and 99 metres, but neither is where the lap is won.
The cited runs are the clearest evidence for that ordering. The laps we found sit between 17.399 in a Car Evolution Bugatti Chiron and 18.299 in a Glickenhaus 007S and a Zenvo Aurora, with the reference run this guide was read from at 17.607, so the spread across hypercars is under a second and the ramp and the chevron corner matter more than the badge. RpM_Jquim's compilation is useful for exactly that reason: four different cars on the same track, with the uploader noting which ran without epic parts.
One consequence worth being straight about. Your Gauntlet division is set by the combined rank of your top five cars, and rank leans heavily on top speed, so a car that suits this track does not have to push your division up. The times attached to some picks are laps other players have posted, included so you can tell whether your own run is close. They are not targets, and none of them is a time we set.
Hyundai IONIQ 5 N
StarterClass D · Gauntlet Market, Division I
The cheapest car in the Gauntlet Market and the usual way into the mode at all. Its low rank keeps your division down, and its electric acceleration covers the standing start and the 14% run to the ramp, which is the one part of this lap where a slow car is truly exposed. The flight works the same at any class: the HUD reads the car at its takeoff speed and up, so a Class D car loses most of its time on the ground before the lip and on the final straight.
Aston Martin DBS 770 Ultimate
StarterClass B · Gauntlet Market, Division II (900 blueprints)
The cheaper of the Division II market cars and a sensible first blueprint target if you are past the IONIQ. On this track the step up buys a quicker run to the ramp and a higher ceiling on the nitro straight from 73%, which is where a Class B car pulls a gap on a Class D one. Learn where the ramp lip is at 14% and where the chevron corner starts at 60% in it before spending on anything faster.
Lamborghini SC18
MidClass A · Gauntlet Market, Division III (2,100 blueprints)
A lot of nitro for a Class A car, which matters here because the last 27% of the lap is spent burning the bar the barrel rolls filled. A car that refills through the 85-metre and 99-metre drifts starts the final run earlier than the reference run's 73%, and one with nitro in hand at 72% exits the chevrons faster than its 375 km/h. The right mid-tier car for learning the lap.
FV Frangivento Sorpasso GT3
MidClass S · Gauntlet Market, Division IV (2,200 blueprints)
The cheaper of the two blueprint cars in the Division IV market, and the step where the final straight stops being a handicap. A reasonable target if you are grinding Gauntlet currency and want a Class S top end without saving for the Division V roster, on a track where the reference car holds 548 to 569 km/h for the last fifteen percent.
Glickenhaus 007S
HighGold in the cited run · Not sold in the Gauntlet Market
Reference run: 18.299 — RpM_Jquim reference run compilation
The slowest of the four cars in RpM_Jquim's compilation, at the same time as the Zenvo Aurora, and the uploader notes it was a gold-tier car. A useful floor for what a maxed Class S car does on this layout: the ramp and the barrel rolls work the same, and the gap to the Chiron laps is on the final straight and in the two drifts.
Zenvo Aurora
HighNot sold in the Gauntlet Market
Reference run: 18.299 — RpM_Jquim reference run compilation
Level with the Glickenhaus in the same compilation, and the uploader notes it ran with no epic parts. A hypercar with a strong top end that on this track shows on the nitro straight from 73%, which is the only place the lap runs on its own momentum for more than a second at a time. A good illustration of how much of Roman Tumble is decided after the chevron corner.
Lykan Neon
HighNot sold in the Gauntlet Market
Reference run: 18.133 — RpM_Jquim reference run compilation
Two tenths quicker than the Glickenhaus and the Zenvo in the same hands, and again noted as running without epic parts. The Lykan's launch suits the 14% run to the ramp, which is where a standing-start lap this short is most easily lost, and its nitro covers the final run to the line. The cheapest way the compilation shows to get under 18.2 on this track.
Bugatti Chiron
HighNot sold in the Gauntlet Market
Reference run: 17.866 — RpM_Jquim reference run compilation
The fastest of the four cars in the compilation, with the uploader noting ten epic parts, and a quarter of a second ahead of the reference run this guide was read from. The Chiron's top end is what this layout rewards on the last 27%, and its launch gets to the ramp lip quickly enough that the flight starts from a high number. The most common reference car on this track.
Bugatti Chiron (Car Evolution)
HighNot sold in the Gauntlet Market
Reference run: 17.399 — Skahn Asphalt legends reference run
The fastest lap we found on this track, almost half a second clear of the standard Chiron in the compilation and two tenths clear of the reference run. The Car Evolution version raises the ceiling on the final straight, and that is exactly where this layout gives time back. Included to show how much an evolved car changes the number rather than as something to aim for.
These are examples of the profile, not a ranked list. The method behind them is in how Asphalt Legends car stats actually work.
Frequently Asked Questions
- How long is Roman Tumble in Asphalt Legends?
- It is one of the two 30-second (30") Rome variations used in Gauntlet, alongside Roman Byroads. The reference runs we cite finish it in 17.399 to 18.299 seconds, and about 2.8 of those seconds are spent in the air across the ramp and the hop that follows it.
- Where is Roman Tumble won and lost?
- At the ramp and in the chevron corner. The reference run leaves the ramp at 14% reading 270 km/h, flies for 1.89 seconds with two barrel rolls and lands at 27% reading 509 km/h, and that flight sets the speed of the whole first half. Later, the 99-metre slide from 60% to 72% drops the car to 333 km/h and exits at 375 km/h, and the remaining 27% is a nitro straight, so the exit speed there is the speed of the entire final third.
- What kind of car is best for Roman Tumble?
- A stable lander first, nitro second, top speed and acceleration third. The ramp lands into a touchdown slide and a second hop within half a second, the two barrel rolls fill the nitro bar that the last 27% of the lap burns, and the final straight is held at 548 to 569 km/h in the reference car. The fastest cited lap was set in a Car Evolution Bugatti Chiron, and the standard Chiron is the quickest of the four cars in RpM_Jquim's compilation.
- How many jumps are there on Roman Tumble?
- Two in the reference run, back to back: 1.89 seconds off the ramp at 14% with two barrel rolls, landing at 27%, and a 0.88-second hop over the embankment from 28% to 38%. There is no ramp after that; the second half of the lap is drifts and a straight.
- How long is the big jump on Roman Tumble?
- The reference run leaves the ramp at 14% with the clock reading 5.7 seconds and lands at 27% with the clock at 7.4, so 1.89 seconds in the air covering about 13% of the track. The HUD climbs from 270 km/h at takeoff to 439 km/h at 20% and reads 509 km/h on the landing, with two barrel rolls registered on the way.
- How many drifts are there on Roman Tumble?
- Two that matter: an 85-metre drift along the river from 42% to 47% that takes the reference car from 478 km/h down to 419, and a 99-metre slide through the chevron-lined corner from 60% to 72% that drops it to 333 km/h. There is a 35-metre touchdown slide at 28% after the barrel-roll landing and a few 4 and 5 metre corrections on the riverside straight, none of which cost anything.
- Can you get a good time on Roman Tumble with an earnable car?
- The Gauntlet Market ladder is the route: the Hyundai IONIQ 5 N at Division I, the Aston Martin DBS 770 Ultimate at Division II, the Lamborghini SC18 at Division III and the FV Frangivento Sorpasso GT3 at Division IV. On this track each rung buys a quicker run to the ramp lip and a higher ceiling on the nitro straight from 73%, and the flight itself reads from the takeoff speed up at any class.
Sources
- Asphalt Wiki - Roman Tumble route card
- Asphalt Wiki - Gauntlet (format, divisions, Gauntlet Market)
- Reference run - 17.607 (River-OL)
- Reference runs - Glickenhaus 007S 18.299, Zenvo Aurora 18.299, Lykan Neon 18.133 and Bugatti Chiron 17.866 (RpM_Jquim)
- Reference run - Bugatti Chiron (Car Evolution), 17.399 (Skahn Asphalt legends)
- Reference runs - Deus Vayanne and Ultima RS (Raian R.)