
Roman Byroads Track Guide: Asphalt Legends Gauntlet (Rome)
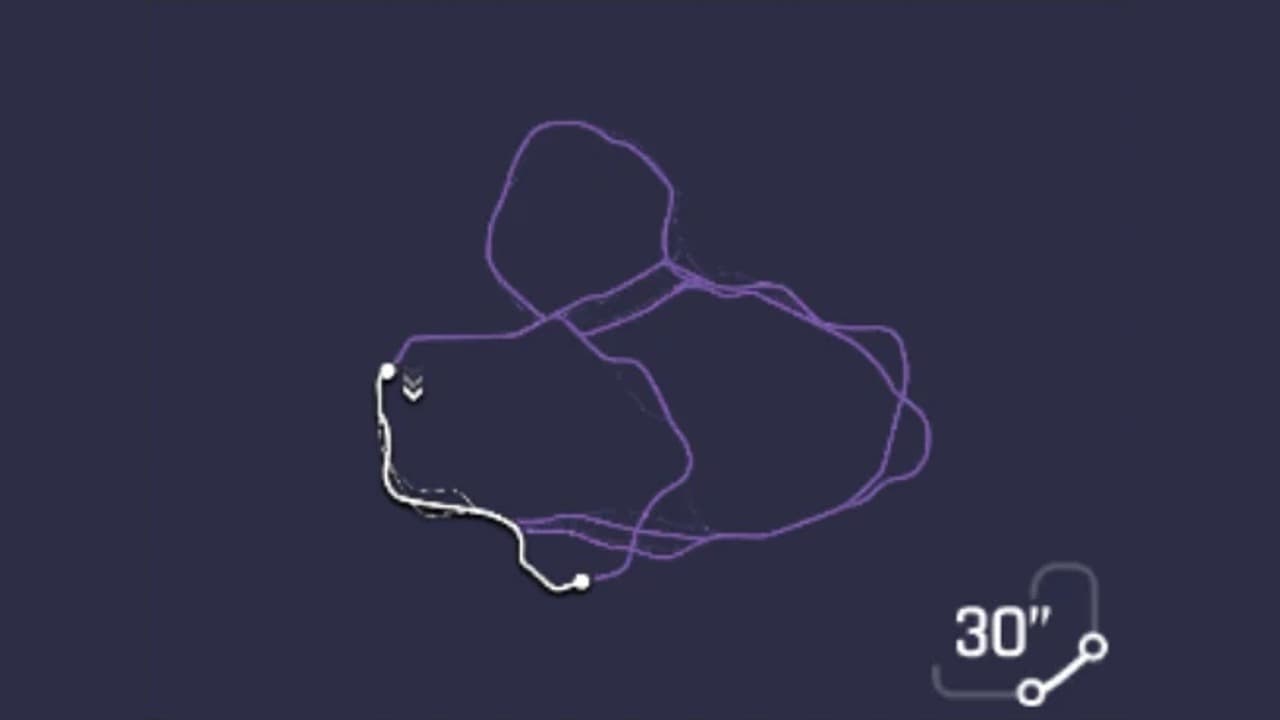 1 Hazard: Standing start on the cobbled side street2 Hazard: The traffic lane and the takedown at 14%3 Nitro: The perfect nitro avenue held at 384 km/h4 Drift: The 98-metre left-hand drift5 Ramp: The red-brick ramp and the 2.21-second double barrel roll6 Ramp: The shockwave ramp and the 3.26-second flight to the line
- 1. Standing start on the cobbled side street
- 2. The traffic lane and the takedown at 14%
- 3. The perfect nitro avenue held at 384 km/h
- 4. The 98-metre left-hand drift
- 5. The red-brick ramp and the 2.21-second double barrel roll
- 6. The shockwave ramp and the 3.26-second flight to the line
What this track demands
The standing start and the second ramp decide this lap. The reference car spends 3.7 of its 16.3 seconds reaching 251 km/h at 10%, and everything after 64% is one landing, one lip and a 3.26-second flight at 509 km/h that crosses the line in the air. Launch hard, take the traffic down for the nitro, land the barrel rolls straight and fire the shockwave on the second lip.
- Acceleration
- 5
- Nitro
- 5
- Air and stunts
- 5
- Top speed
- 4
- Drift
- 3
- Handling
- 2
The 30 seconds, beat by beat
The standing start on the cobbled side street
Standing start on the cobbled side street
Roman Byroads launches from a dead stop on a narrow cobbled street between orange-awning shopfronts, with the road kinking gently right almost at once. The reference run reads 44 km/h at 0.5 seconds still on 0%, 65 km/h at 0.7 seconds, 104 km/h at 1% and 142 km/h at 2% with 1.7 seconds on the clock. The cobbles give way to tarmac as the street opens out: 174 km/h at 4%, 200 km/h at 6%, 227 km/h at 8% and 251 km/h at 10% with 3.7 seconds gone. Nothing here asks for steering; the launch sets the speed the car carries into the traffic.
The traffic lane and the takedown at 14%
The traffic lane and the takedown at 14%
From 8% a truck and then a car sit in the lane ahead. The reference run reads 272 km/h at 11% and 276 km/h at 13% as it hits the car in a shower of sparks, and the HUD shows TRAFFIC DOWN at 14% reading 291 km/h with 4.5 seconds on the clock. The takedown is worth more than the car it clears: a nitro refill icon appears at 22% as the bar fills, which is what the perfect nitro at 28% is fired from. The run keeps climbing through 305 km/h at 15%, 318 at 16%, 330 at 18% and 349 km/h at 20%, past the second takedown tag at 23% reading 358 km/h.
The perfect nitro avenue held at 384 km/h
The perfect nitro avenue held at 384 km/h
At 25% the street opens onto a wide tree-lined avenue and the run fires its nitro: 367 km/h at 25%, 368 at 26% and PERFECT NITRO on the HUD at 28% reading 375 km/h with 7.0 seconds on the clock. From 7.2 seconds the speed reads 384 km/h and stays there, at 28%, 29%, 31%, 32%, 34% and 35%, the highest number the car shows on the ground all lap. It dips to 380 km/h at 37% with 8.7 seconds gone as the avenue bends toward the corner. This straight covers ten percent of the track in 1.7 seconds.
The 98-metre left-hand drift
The 98-metre left-hand drift
The only real corner comes at 38%, where the avenue turns left and the reference run starts sliding at 372 km/h with 26 metres on the drift counter. The slide reads 46 metres at 40% and 356 km/h, 65 metres at 42% and 351 km/h, 80 metres at 43% and 342 km/h, and 98 metres at 45% reading 341 km/h, the slowest the car runs between the launch and the second landing. It straightens at 46% reading 343 km/h with a second nitro refill icon on the HUD, and reads 353 km/h at 47% with 10.5 seconds on the clock, pointed at the ramp.
The red-brick ramp and the 2.21-second double barrel roll
The red-brick ramp and the 2.21-second double barrel roll
At 49% the road climbs a red-brick ramp and the reference run is on it reading 346 km/h at 10.7 seconds. The game reads the car faster the longer it flies: 374 km/h at 50% with 0.27 seconds on the air counter, 406 km/h at 51%, 453 km/h at 53% as the first barrel roll registers, 500 at 55% and 509 km/h at 57% with PERFECT RUN on the HUD at 12.0 seconds. The second barrel roll registers at 60% and the car holds 509 km/h at 62% with 2.01 seconds in the air, then comes down at 64% reading 340 km/h with the counter stopped at 2.21 seconds and the clock at 13.0.
The shockwave ramp and the 3.26-second flight to the line
The shockwave ramp and the 3.26-second flight to the line
The landing is not the end of the air. At 65% the run hits a traffic car on touchdown and reads 254 km/h, the slowest number after the launch, and is airborne again within a quarter of a second on a second ramp. NITRO SHOCKWAVE appears at 66% reading 274 km/h at 13.5 seconds, and the HUD climbs from there: 306 km/h at 67%, 344 at 68%, 380 at 69%, 427 at 71%, 486 at 72% and 509 km/h at 73% with 15.0 seconds on the clock. The car holds 509 km/h through 74% and 75%, the distance jumps to 83% and then 96% as the flight crosses the final curl of the route, and the clock stops at 16.299 with 3.26 seconds in the air.
Where the run is won
- The launch and the traffic to 28%. The reference run spends 3.7 seconds reaching 251 km/h at 10% and 7.0 seconds reaching the perfect nitro at 28%, and the bar that nitro is fired from is filled by the takedown at 14%. On a 16.3-second lap, the first 28% is 43% of the clock.
- The second ramp at 66%. The run comes down from the barrel rolls at 64% reading 340 km/h, hits a traffic car at 65% reading 254 km/h and fires a nitro shockwave on the lip at 66%. From there the lap is a 3.26-second flight that reads 509 km/h from 73% to the line, so whatever the car carries onto that lip is its finishing speed.
What wrecks a run
- A slow launch. The reference car needs 1.7 seconds to read 142 km/h and 3.7 seconds to reach 251 km/h at 10%, and the road asks for nothing but throttle until the traffic at 13%. A car that leaves the cobbles slowly reaches the perfect nitro at 28% later and everything after it is late.
- Weaving past the traffic at 13% instead of through it. The TRAFFIC DOWN at 14% is where the nitro refill at 22% comes from, and the perfect nitro at 28% is what holds 384 km/h from 7.2 to 8.5 seconds. Dodge the car and the straight is run on whatever nitro the launch left.
- Running wide out of the drift at 38%. The reference run holds 341 to 356 km/h through 98 metres of slide and reaches the ramp at 49% reading 346 km/h. The flight reads from the takeoff speed up, so a drift that scrubs more than that shortens the 2.21-second double barrel roll and lands short of 509 km/h.
- Landing the barrel rolls crooked at 64%. The run comes down at 340 km/h, hits a traffic car at 65% reading 254 km/h and is on the second lip within a quarter of a second. A sideways landing turns the shockwave ramp at 66% into a slow hop, and the final third of the track is flown at whatever speed the car has left.
Which car to bring
Read this track the way our car stats guide suggests: count the places the layout forces you to slow down, then look at what it gives you back. Roman Byroads forces it twice (the standing start and the 98-metre drift at 38%) and in return hands you a perfect nitro avenue held at 384 km/h from 28% to 35%, a 2.21-second double barrel roll that reads 509 km/h, and a second ramp at 66% whose 3.26-second flight carries the car over the last third of the route and across the line at 509 km/h.
In priority order: acceleration, because the standing start on cobbles takes the reference car 3.7 seconds to reach 251 km/h at 10% and 7.0 seconds to reach the perfect nitro at 28%, which is 43% of a 16.3-second lap. Nitro next, because the lap is a chain of refills and burns: the takedown at 14% fills the bar for the perfect nitro at 28%, the drift at 38% fills it again for the ramp, and the shockwave on the second lip at 66% is what turns a 254 km/h landing into a 509 km/h flight. Air third, meaning a car that lands stable, because the barrel-roll landing at 64% is followed by a traffic car and a second lip within a quarter of a second. Top speed matters on the avenue, where the run holds 384 km/h on the ground, and in the air, where both flights read 509 km/h. Handling barely matters: there is one corner, and the run slides through it.
The cited runs are the clearest evidence for that ordering. The fastest lap we found is 16.299 in a Ferrari SF90 Stradale, set by pickle_asphalt and uploaded on the Best Way Only channel, and that is the run this guide was read from. The same car in other hands posts 19.329, three seconds slower on the same track, and the SF90 Evo, a pre-nerf Lykan HyperSport Evo and a Rimac Nevera all land between 18.4 and 19.0. The spread inside one model is wider than the spread across the hypercars, which says the takedown, the drift exit and the second lip matter more than the badge.
One consequence worth being straight about. Your Gauntlet division is set by the combined rank of your top five cars, and rank leans heavily on top speed, so a car that suits this track does not have to push your division up. The times attached to some picks are laps other players have posted, included so you can tell whether your own run is close. They are not targets, and none of them is a time we set.
Hyundai IONIQ 5 N
StarterClass D · Gauntlet Market, Division I
The cheapest car in the Gauntlet Market and the usual way into the mode at all. Its low rank keeps your division down, and its electric launch is the one stat this track rewards before anything else: the reference car spends 3.7 seconds on the first 10% of the lap, and that is where a slow car is exposed. The two flights work the same at any class, because the HUD reads the car from its takeoff speed up.
Aston Martin DBS 770 Ultimate
StarterClass B · Gauntlet Market, Division II (900 blueprints)
The cheaper of the Division II market cars and a sensible first blueprint target if you are past the IONIQ. On this track the step up buys a quicker run to the traffic at 13% and a higher number on the avenue, where the reference car holds 384 km/h. Learn where the red-brick ramp is at 49% and where the second lip sits at 66% in it before spending on anything faster.
Lamborghini SC18
MidClass A · Gauntlet Market, Division III (2,100 blueprints)
A lot of nitro for a Class A car, which matters here because the lap is a chain of refills and burns: a takedown at 14%, a perfect nitro at 28%, a drift refill at 46% and a shockwave on the second lip at 66%. A car that fills faster fires the avenue nitro earlier than the reference run and still has a bar in hand for the lip. The right mid-tier car for learning the lap.
FV Frangivento Sorpasso GT3
MidClass S · Gauntlet Market, Division IV (2,200 blueprints)
The cheaper of the two blueprint cars in the Division IV market, and the step where the avenue stops being a handicap. A reasonable target if you are grinding Gauntlet currency and want a Class S top end without saving for the Division V roster, on a track where the reference car reads 384 km/h on the ground and 509 km/h in the air.
Glickenhaus 007S
HighNot sold in the Gauntlet Market
Reference run: 20.399 — Crazypan reference run (TouchDrive)
The slowest cited lap on this track, and the uploader notes it was driven on TouchDrive, which steers for you and takes the drift at 38% on its own line. A useful floor for what a Class S car does on this layout with the launch and the two ramps handled by the game: four seconds behind the reference SF90, most of it on the ground before 28% and in the drift exit.
Rimac Nevera
HighNot sold in the Gauntlet Market
Reference run: 18.933 — diaf reference run
An electric hypercar with the launch this track asks for first, and a lap half a second inside the Lykan and the SF90 Evo. The Nevera covers the cobbles and the run to the traffic at 13% as well as anything, and its ceiling shows on the avenue. Two and a half seconds off the reference SF90, which on this track is the gap between a clean lap and one that nails the takedown, the drift exit and the second lip.
W Motors Lykan HyperSport Evo
HighNot sold in the Gauntlet Market
Reference run: 18.499 — Qwerty reference run (pre-nerf)
Set before the car was nerfed, as the uploader notes in the title, so treat the number as a ceiling for the car rather than what it does today. The Lykan Evo has the launch for the cobbles and the nitro for the avenue and the second lip, and its lap sits between the Nevera and the SF90 Evo. A good illustration of how close the hypercars run on this layout once the two ramps are landed straight.
Ferrari SF90 Stradale Evo
HighNot sold in the Gauntlet Market
Reference run: 18.433 — Ixsane reference run
The evolved SF90, and the quickest of the cited laps that is not the reference run. The Evo raises the ceiling on the avenue and in the air, which is where this layout gives time back, and its lap is two seconds behind the standard SF90 in pickle_asphalt's hands. Included to show that on Roman Byroads the driver's takedown, drift exit and second lip are worth more than the evolution.
Ferrari SF90 Stradale
HighNot sold in the Gauntlet Market
Reference run: 16.299 — pickle_asphalt reference run (Best Way Only)
The fastest lap we found on this track and the run this guide was read from: 251 km/h at 10%, a takedown at 14%, a perfect nitro held at 384 km/h from 28% to 35%, a 98-metre drift, a 2.21-second double barrel roll and a 3.26-second shockwave flight across the line. The same car posts 19.329 in another uploader's hands on the same layout, which is the clearest measure on this track of how much the launch, the takedown and the second lip are worth.
These are examples of the profile, not a ranked list. The method behind them is in how Asphalt Legends car stats actually work.
Frequently Asked Questions
- How long is Roman Byroads in Asphalt Legends?
- It is one of the two 30-second (30") Rome variations used in Gauntlet, alongside Roman Tumble. The reference runs we cite finish it in 16.299 to 20.399 seconds, and in the fastest of them about 5.5 seconds are spent in the air across the two ramps.
- Where is Roman Byroads won and lost?
- At the start and on the second ramp. The reference run spends 3.7 seconds reaching 251 km/h at 10% and 7.0 seconds reaching its perfect nitro at 28%, so the launch and the traffic takedown at 14% set almost half the lap. Then the landing at 64% runs straight into a second lip at 66%, and the nitro shockwave fired there sets the speed of a 3.26-second flight that crosses the line at 509 km/h.
- What kind of car is best for Roman Byroads?
- Acceleration first, nitro second, a stable lander third. The standing start on cobbles is the longest slow section of the lap, the nitro bar is filled and burned four times between the takedown at 14% and the shockwave at 66%, and the barrel-roll landing at 64% is followed by a traffic car and a second lip within a quarter of a second. The fastest cited lap was set in a Ferrari SF90 Stradale.
- How many jumps are there on Roman Byroads?
- Two, and they are nearly back to back: a red-brick ramp at 49% that the reference run flies for 2.21 seconds with two barrel rolls, landing at 64%, and a second ramp at 66% that it flies for 3.26 seconds with a nitro shockwave fired on the lip. The second flight crosses the finish line before the car comes down.
- Do you really finish Roman Byroads in the air?
- In the reference run, yes. The car leaves the second ramp at 66% with 13.5 seconds on the clock, holds 509 km/h from 73%, and the distance counter jumps from 75% to 83% and then 96% in the last three tenths as the flight cuts across the final curl of the route. The clock stops at 16.299 with the air counter reading 3.26 seconds, and the car lands after the race results appear.
- How many drifts are there on Roman Byroads?
- One that matters: the left-hander at 38%, where the reference run slides 98 metres and drops from 372 km/h to 341 km/h before straightening at 46% with a nitro refill. There is nothing else to slide through; the rest of the lap is a standing start, a straight, and two ramps.
- Can you get a good time on Roman Byroads with an earnable car?
- The Gauntlet Market ladder is the route: the Hyundai IONIQ 5 N at Division I, the Aston Martin DBS 770 Ultimate at Division II, the Lamborghini SC18 at Division III and the FV Frangivento Sorpasso GT3 at Division IV. On this track each rung buys a quicker launch off the cobbles and a higher number on the avenue, and both flights read from the takeoff speed up at any class, so the ramps reward the same clean landing whatever you drive.
Sources
- Asphalt Wiki - Roman Byroads route card
- Asphalt Wiki - Gauntlet (format, divisions, Gauntlet Market)
- Reference run - Ferrari SF90 Stradale, 16.299 (pickle_asphalt, on the Best Way Only channel)
- Reference run - Ferrari SF90 Stradale, 19.329 (QuanTheAznPoop)
- Reference run - Ferrari SF90 Stradale Evo, 18.433 (Ixsane)
- Reference run - W Motors Lykan HyperSport Evo, 18.499 (pre-nerf, Qwerty)
- Reference run - Rimac Nevera, 18.933 (diaf)
- Reference run - Glickenhaus 007S on TouchDrive, 20.399 (Crazypan)