
Ghost Ships Track Guide: Asphalt Legends Gauntlet (Scotland)
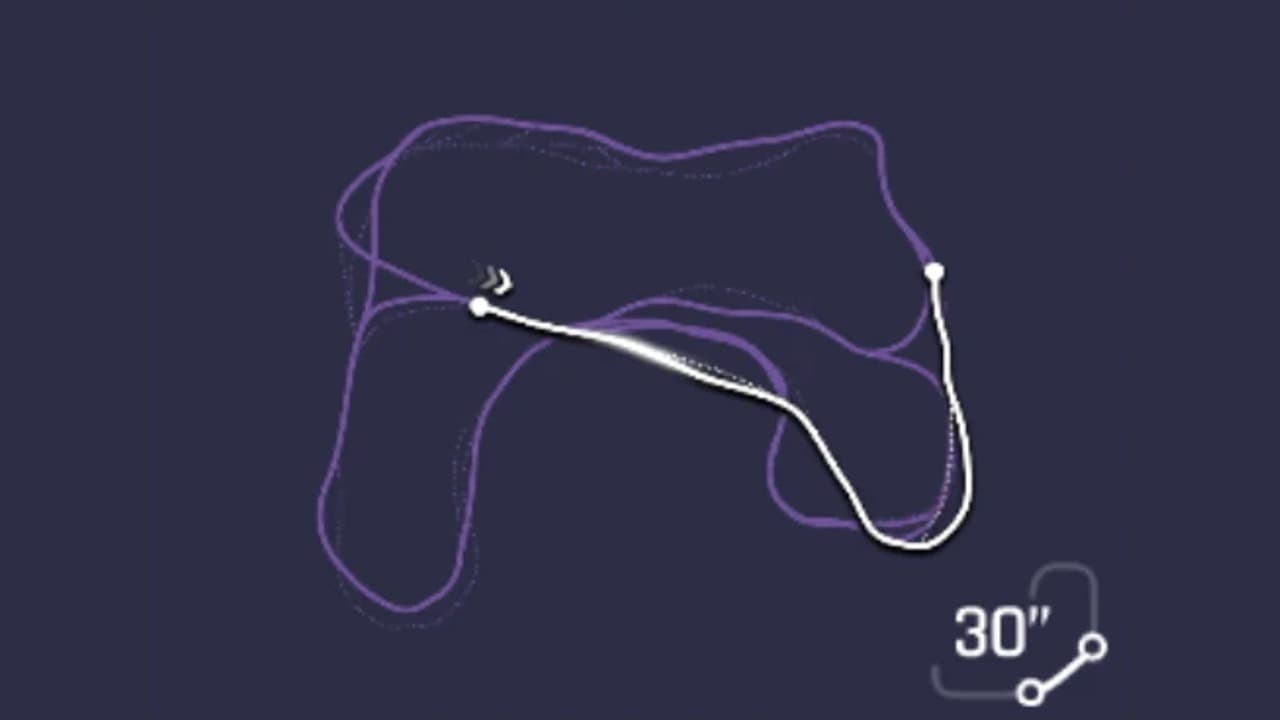 1 Hazard: Standing start on the coast road2 Ramp: The chevron ramp into the first wreck3 Nitro: The 474 km/h run through the hull4 Ramp: The 2.04-second leap with two barrel rolls5 Drift: The second wreck, the exit drift and the rock jump6 Drift: The 104-metre shore drift and the finish ramp
- 1. Standing start on the coast road
- 2. The chevron ramp into the first wreck
- 3. The 474 km/h run through the hull
- 4. The 2.04-second leap with two barrel rolls
- 5. The second wreck, the exit drift and the rock jump
- 6. The 104-metre shore drift and the finish ramp
What this track demands
Five airborne moments and two runs through a ship hull make this a lap about carrying speed through things that want to slow the car down. What decides it is leaving the first hull at 474 km/h and keeping the car straight through the 2.04-second barrel-roll leap, then not bleeding speed in the 104-metre shore drift before the final ramp.
- Air and stunts
- 5
- Top speed
- 4
- Acceleration
- 4
- Nitro
- 4
- Handling
- 3
- Drift
- 3
The 30 seconds, beat by beat
The standing start on the coast road
Standing start on the coast road
Ghost Ships launches from a dead stop on a tarmac road with a yellow centre line, wind turbines on the skyline and a fence along the left. The reference run reads 36 km/h half a second in with 0% of the track behind it, 88 km/h at 1.3 seconds still on 0%, 147 km/h at 2% and 198 km/h at 5%. The road eases left then right past the Asphalt barriers and a bridge, and the run reads 249 km/h at 8%, 286 km/h at 11% with a 12-metre correction drift through the kink, and 298 km/h at 12%. Nothing here needs more than small steering inputs; the launch sets the speed the car carries into the first ramp.
The chevron ramp into the first wreck
The chevron ramp into the first wreck
At 13% a ramp lined with green chevrons sits across the road and the reference run hits it at 324 km/h, reading 352 km/h at 14% and 405 km/h at 15% while airborne, with the air counter stopping at 0.76 seconds. The car comes down at 16% reading 330 km/h on a concrete apron in front of the shipyard, and the next five percent are a slide into the wreck: 32 metres of drift at 17% reading 341 km/h, 35 metres at 18% reading 344, then 357 at 19%, 373 at 20% and 397 km/h at 21% as the hull swallows the car. The clock reads 5.5 seconds at the ramp and 7.5 at the entry.
The 474 km/h run through the hull
The 474 km/h run through the hull
From 21% to 35% the route is inside a rusting ship, lit pink along its ribs, and it is the fastest the car runs on the ground all lap. The reference run reads 425 km/h at 23%, dips to 392 km/h at 26% through the one bend in the hull, then climbs again: 404 at 29%, 418 at 30%, 444 at 32% and 474 km/h at 34%, which is where the HUD peaks. The clock reads 7.8 seconds at the entry and 10.0 at 34%. The exit at 35% comes out at 459 km/h into a container yard, where the run reads 424 km/h at 37% and 413 km/h at 38% as it lines up the dock edge.
The 2.04-second leap with two barrel rolls
The 2.04-second leap with two barrel rolls
At 39% the dock ends and the reference run is airborne reading 422 km/h, over timber ramps and the second wreck below. The game reads it faster the longer it flies: 445 km/h at 41%, 467 at 42% as the first barrel roll registers, and 474 km/h held from 43% to 47% with the second barrel roll on the HUD. The air counter stops at 2.04 seconds and the run touches down at 49% reading 403 km/h on the far dock, with the clock reading 10.5 seconds at takeoff and 12.6 at the landing. A nitro shockwave fires at 51% reading 401 km/h, two percent after the wheels touch, and the run reads 427 km/h by 53%.
The second wreck, the exit drift and the rock jump
The second wreck, the exit drift and the rock jump
The shockwave carries the run into a second hull at 437 km/h at 55% and 443 km/h at 56%, where a second set of green chevrons at 57% marks a ramp out of the ship. The car leaves it at 58% reading 433 km/h, flies 0.73 seconds and comes down at 60% reading 383 km/h on the shore. A 62-metre drift follows from 61% reading 360 km/h, a second shockwave fires at 64% reading 390, and the run reads 415 km/h at 66% before a rock outcrop at 67% throws it into the air for 1.08 seconds and the HUD drops to 341 km/h. It reads 370 km/h at 68% and 381 km/h at 71%.
The 104-metre shore drift and the finish ramp
The 104-metre shore drift and the finish ramp
From 74% the coast road sweeps along a fence line and the reference run spends the next ten percent sideways: 25 metres of drift at 75% reading 370 km/h, 64 metres at 76%, 99 metres at 79% reading 334 km/h, and 104 metres at 83%, with a third shockwave at 80% reading 350. The run then holds 347 km/h flat from 85% to 90%, reads 352 at 91% and 359 at 93%, and hits the final ramp at 94% reading 386 km/h. The HUD climbs to 404 at 95% and 449 km/h at 97% through a 0.92-second flight over the FINISH banner, and the car lands at 99% reading 419 km/h with 22.799 on the clock.
Where the run is won
- The hull exit at 35%. The reference run reads 474 km/h at 34%, leaves the first wreck at 459 km/h and takes off from the dock at 39% reading 422 km/h, and the game holds that flight through 2.04 seconds and two barrel rolls. Every km/h missing at the dock edge is missing from the whole leap and from the landing at 49%.
- The shore drift from 75% to 83%. The run slides 104 metres along the fence line and comes out reading 347 km/h, then holds that number for five percent before the final ramp at 94%. A drift that over-rotates here lands the car on the last ramp slower, and the 0.92-second flight to the line is read at whatever speed the car carried onto it.
What wrecks a run
- Landing the first ramp crooked. The reference run comes down at 16% reading 330 km/h and slides 35 metres into the hull entry, back to 397 km/h by 21%. Land sideways and the slide becomes a wall tap on the hull mouth, and the whole 474 km/h run through the ship starts from a lower number.
- Firing nitro inside the first hull. The run reads 474 km/h at 34% on its own momentum and saves its first shockwave for 51%, two percent after the barrel-roll landing. Burning the bar inside the hull leaves nothing to recover the 403 km/h landing at 49%.
- Over-rotating the rock jump at 67%. The run leaves the outcrop reading 415 km/h and lands reading 341 km/h after 1.08 seconds, a 74 km/h cost even when it lands straight. A sideways landing adds a correction drift into the 104-metre sweep and the car arrives at the fence line slower than 370 km/h.
- Coasting the last ten percent. The run holds 347 km/h from 85% to 90% with the shockwave bar refilling and only reads 386 km/h at the final ramp. A run with nitro in hand at 90% gets onto that ramp faster, and the 0.92-second flight to the line is read at the takeoff speed.
Which car to bring
Read this track the way our car stats guide suggests: count the places the layout forces you to slow down, then look at what it gives you back. Ghost Ships forces it four times (the standing start, the landing at 16%, the barrel-roll landing at 49% and the rock jump at 67%) and in return hands you a fourteen-percent hull straight where the reference car reads 474 km/h and five airborne moments that between them keep the car off the ground for about five of the lap's twenty-three seconds.
In priority order: air, meaning a car that lands stable and straight, because the 2.04-second leap at 39% and the rock jump at 67% both land into sections that need the car pointing the right way immediately. Top speed next, because the hull straight from 21% to 35% is the only part of the lap where the car runs on its own momentum for more than a second and the HUD reads 474 km/h at the end of it. Acceleration and nitro share third: the standing start takes the reference car 2.2 seconds to reach 147 km/h, and the three shockwaves at 51%, 64% and 80% are each fired to recover a landing or a drift exit. Handling and drift matter more here than on Rocky Valley, with a 62-metre drift at 61% and a 104-metre slide along the shore, but neither is where the lap is won.
The cited runs are the clearest evidence for that ordering. The laps we found sit between 22.499 in a Ferrari SF90 Stradale and 23.166 in a Bugatti Chiron, and the same Chiron posts 22.699 in another player's hands, so the spread between hypercars is under a second and the driving matters more than the badge. Rival's own note on the Battista run says 22.6 is possible, and frag_'s Car Evolution SF90 video lists 20.533 and 21.466 for this track, which shows how much an evolved car changes the ceiling.
One consequence worth being straight about. Your Gauntlet division is set by the combined rank of your top five cars, and rank leans heavily on top speed, so a car that suits this track does not have to push your division up. The times attached to some picks are laps other players have posted, included so you can tell whether your own run is close. They are not targets, and none of them is a time we set.
Hyundai IONIQ 5 N
StarterClass D · Gauntlet Market, Division I
The cheapest car in the Gauntlet Market and the usual way into the mode at all. Its low rank keeps your division down, and its electric acceleration covers the standing start and the climb to the first ramp at 13%, which is the one part of this lap where a slow car is truly exposed. The leaps work the same at any class: the HUD reads the car at its flight speed whatever it is rated at, so a Class D car loses most of its time on the ground between 0% and 13% and inside the hull.
Aston Martin DBS 770 Ultimate
StarterClass B · Gauntlet Market, Division II (900 blueprints)
The cheaper of the Division II market cars and a sensible first blueprint target if you are past the IONIQ. On this track the step up buys a quicker launch to the ramp and a higher number through the hull straight, which is where a Class B car pulls a gap on a Class D one. Learn where the dock edge comes at 39% and where the rock jump sits at 67% in it before spending on anything faster.
Lamborghini SC18
MidClass A · Gauntlet Market, Division III (2,100 blueprints)
A lot of nitro for a Class A car, which matters here because the three shockwaves at 51%, 64% and 80% each recover a landing or a drift exit. A car that refills through the 35-metre and 62-metre drifts fires each of them earlier, and one with nitro in hand at 90% gets onto the final ramp faster than the reference run's 386 km/h. The right mid-tier car for learning the lap.
FV Frangivento Sorpasso GT3
MidClass S · Gauntlet Market, Division IV (2,200 blueprints)
The cheaper of the two blueprint cars in the Division IV market, and the step where the hull straight stops being a handicap. A reasonable target if you are grinding Gauntlet currency and want a Class S top end without saving for the Division V roster, on a track where the ground speed inside the first wreck decides the speed of the biggest leap.
Lamborghini Sian
HighReference run: 23.099 — Rival reference run
The slowest of Rival's three cited runs on this track, four tenths behind the Battista lap from the same player. A hybrid with a strong launch and a lower ceiling than the electric hypercars above it, and on a lap where the hull straight reads 474 km/h in the reference car, that ceiling is where the gap shows. A good illustration of how much of this lap is decided by top end rather than launch.
Bugatti Chiron
HighNot sold in the Gauntlet Market
Reference run: 22.699 — Sehaj reference run
The most common reference car on this track. The cited run is labelled post-nerf by its uploader and sits a tenth ahead of the Dendrobium lap this guide was read from, while another player posts 23.166 in the same car. The half second between those two laps is driving, not hardware, and the Chiron's top end is well suited to the hull straight and the long flights.
Vanda Electrics Dendrobium
HighRank 4,099 (golden) in the cited run · Not sold in the Gauntlet Market
Reference run: 22.799 — Rival reference run
The car this entire guide was read from, and the uploader's own note says the handling is what makes it work here. The run shows exactly where that pays: a straight landing at 16% that slides cleanly into the hull, a 2.04-second barrel-roll leap that comes down pointing at the second wreck, and a 104-metre shore drift that exits at 347 km/h without a correction. An electric car with a modest top end for its class, which keeps the division down.
Pininfarina Battista
HighRank 4,550 (golden) in the cited run · Not sold in the Gauntlet Market
Reference run: 22.7 — Rival reference run
An electric hypercar with instant acceleration off the standing start and a high ceiling for the hull straight, which is the whole profile this layout rewards. The cited run is a tenth quicker than the Dendrobium lap from the same player, and the uploader's note says the car can also do under 23 seconds and that 22.6 is possible, which says the time on this track is in the landings rather than the car.
Bugatti Chiron Pur Sport
HighNot sold in the Gauntlet Market
Reference run: 22.533 — QuanTheAznPoop reference run
The lighter, sharper Chiron, and on this track the sharpness buys a cleaner line through the 62-metre exit drift and the 104-metre shore sweep. The cited run is under two tenths clear of the standard Chiron lap and within four hundredths of the fastest lap we found, from the same uploader in the same video, so the two cars are close enough that the difference is in the drifts.
Ferrari SF90 Stradale
HighNot sold in the Gauntlet Market
Reference run: 22.499 — QuanTheAznPoop reference run
The fastest unevolved lap we found on this track, three tenths clear of the Dendrobium run this guide was read from. A plug-in hybrid with electric torque off the line and a strong nitro, which covers the standing start and the three shockwave recoveries, and the uploader's note says the run adds a 360 on the ship shortcut for extra nitro. In Car Evolution form the same car is listed at 20.533 on this track by another player.
These are examples of the profile, not a ranked list. The method behind them is in how Asphalt Legends car stats actually work.
Frequently Asked Questions
- How long is Ghost Ships in Asphalt Legends?
- It is one of the two 30-second (30") Scotland variations used in Gauntlet, alongside Rocky Valley. The reference runs we cite finish it in 22.499 to 23.166 seconds, and about five of those seconds are spent in the air across five ramps and jumps.
- Where is Ghost Ships won and lost?
- At the first hull exit and on the shore drift. The reference run reads 474 km/h at 34% inside the first wreck and takes off from the dock at 39% reading 422 km/h, and the game holds that flight for 2.04 seconds and two barrel rolls. Later, a 104-metre drift from 75% to 83% exits at 347 km/h and sets the speed the car carries onto the final ramp at 94%. A run that leaves the hull slow or over-rotates the shore drift is slower for the whole stretch that follows.
- What kind of car is best for Ghost Ships?
- A stable lander first, top speed second, acceleration and nitro third. Two of the five airborne moments land into sections that need the car straight immediately, the hull straight from 21% to 35% is the only place the car runs on its own momentum for more than a second, and three shockwaves recover the landings and drift exits. The fastest cited lap was set in a Ferrari SF90 Stradale, and the guide was read from a Vanda Electrics Dendrobium whose uploader credits its handling.
- How many jumps are there on Ghost Ships?
- Five in the reference run: 0.76 seconds off the chevron ramp at 13%, 2.04 seconds off the dock at 39% with two barrel rolls, 0.73 seconds off the second wreck ramp at 57%, 1.08 seconds over the rock outcrop at 67%, and 0.92 seconds off the final ramp at 94% over the finish banner.
- How long is the big jump on Ghost Ships?
- The reference run leaves the dock at 39% with the clock reading 10.5 seconds and lands at 49% with the clock at 12.6, so 2.04 seconds in the air covering about 10% of the track. The HUD reads 474 km/h from 43% to 47% while the car turns two barrel rolls over the timber ramps and the second wreck.
- How many drifts are there on Ghost Ships?
- Three that matter: a 35-metre slide into the first hull from 17% to 18%, a 62-metre drift out of the second wreck at 61% to 63%, and a 104-metre slide along the shore from 75% to 83% that takes the reference car from 370 km/h down to 334 km/h and back to 347. There is a 12-metre correction at 11% and a few short twitches inside the hulls, none of which cost anything.
- Can you get a good time on Ghost Ships with an earnable car?
- The Gauntlet Market ladder is the route: the Hyundai IONIQ 5 N at Division I, the Aston Martin DBS 770 Ultimate at Division II, the Lamborghini SC18 at Division III and the FV Frangivento Sorpasso GT3 at Division IV. On this track each rung buys a quicker launch to the first ramp and a higher number through the hull straight, and the flights themselves read the same speed at any class.
Sources
- Asphalt Wiki - Scotland (track variants and route maps)
- Asphalt Wiki - Gauntlet (format, divisions, Gauntlet Market)
- Reference run - Vanda Electrics Dendrobium, 22.799 (Rival)
- Reference run - Pininfarina Battista, 22.7 (Rival)
- Reference run - Lamborghini Sian, 23.099 (Rival)
- Reference run - Bugatti Chiron, 22.699 (Sehaj)
- Reference run - Bugatti Chiron, 23.166 (Z.R.9)
- Reference runs - Bugatti Chiron Pur Sport, 22.533 and Ferrari SF90 Stradale, 22.499 (QuanTheAznPoop)
- Reference run - Lamborghini Egoista, 22.988 (QuanTheAznPoop)
- Reference run - Deus Vayanne, 22.977 (Scribbles)
- Reference runs - Ferrari SF90 Stradale (Car Evolution), Rocky Valley and Ghost Ships (frag_)