
The Tunnel Track Guide: Asphalt Legends Gauntlet (San Francisco)
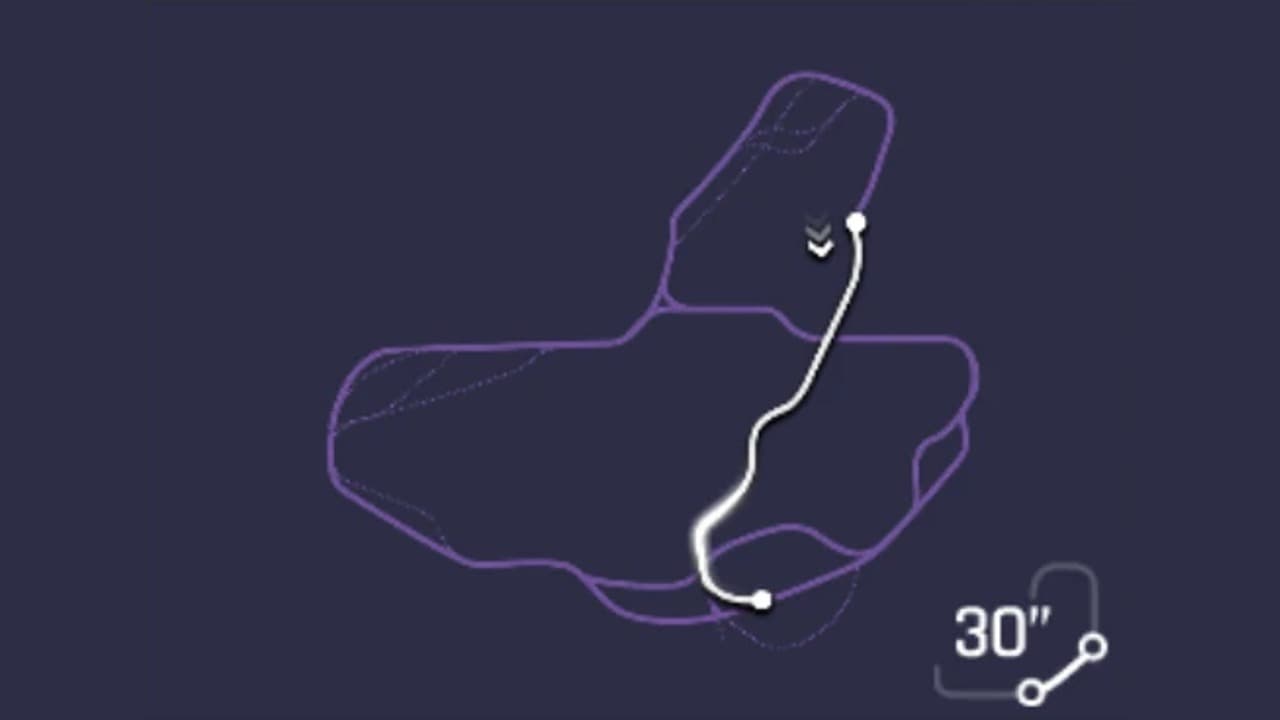 1 Hazard: Standing start on the street and into the tunnel mouth2 Nitro: The tunnel straight and the first nitro3 Drift: The 41-metre drift at the tunnel exit4 Ramp: The 2.7-second leap at 562 km/h5 Drift: The landing and the three drifts6 Nitro: The shockwave sprint to the rail yard
- 1. Standing start on the street and into the tunnel mouth
- 2. The tunnel straight and the first nitro
- 3. The 41-metre drift at the tunnel exit
- 4. The 2.7-second leap at 562 km/h
- 5. The landing and the three drifts
- 6. The shockwave sprint to the rail yard
What this track demands
The lap is a 40-percent straight from a standing start, and the speed the car carries out of the tunnel at 41% is the speed it takes into a 2.7-second leap. What decides it is how quickly the car climbs from 60 to 400 km/h underground and how little of that it gives back in the three drifts after the landing.
- Top speed
- 4
- Acceleration
- 4
- Nitro
- 4
- Air and stunts
- 4
- Drift
- 3
- Handling
- 2
The 30 seconds, beat by beat
The standing start on the street and into the tunnel mouth
Standing start on the street and into the tunnel mouth
The Tunnel launches from a dead stop on a city street, with fire hydrants along the right kerb. The reference run reads 60 km/h two thirds of a second in with 0% of the track behind it, 95 km/h at 1% and 141 km/h at 2%, and by that second percent the road has already dropped into the tunnel. Nothing on this stretch asks for steering: 200 km/h at 6%, 236 km/h at 10%, all in a straight line under the lights. The launch sets the speed for everything that follows, because the next 30% of the lap is one unbroken straight that only ever adds to it.
The tunnel straight and the first nitro
The tunnel straight and the first nitro
From 10% to 37% the reference run is flat out between the tunnel walls. It reads 250 km/h at 11% and 275 km/h at 15%, then fires nitro and jumps to 300 km/h within the same percent, 330 km/h at 19% and 342 km/h at 22%, where it punches through two breakable obstacles with the counter showing a pair destroyed. The uploader notes a wall touch at 26% in this run, and the speed trace barely flinches: 358 km/h at 27%, 370 km/h at 30%, 387 km/h at 34%, 397 km/h at 37%. This is the only place on the lap where a top-speed ceiling shows, and it lasts nearly six seconds.
The 41-metre drift at the tunnel exit
The 41-metre drift at the tunnel exit
At 37% the tunnel bends towards the daylight and the reference run starts its first drift at 397 km/h. The counter reads 32 metres at 38%, 41 metres at 40%, and the slide is over by 41% with the car reading 402 km/h, the fastest it has been on the ground all lap. The drift costs almost nothing, because the exit curve is wide and the car is still accelerating out of the nitro, and it fills the bar for the leap ahead. A pink Gauntlet banner marks the exit. The one job here is to keep the nose pointing at the ramp, since the car leaves the ground about a second later.
The 2.7-second leap at 562 km/h
The 2.7-second leap at 562 km/h
At 43% the road ends and the car is airborne reading 397 km/h, with the Golden Gate Bridge off to the right and the waterfront below. The game then reads the car faster and faster in the air: 412 km/h at 45%, 456 km/h at 48%, 492 km/h at 50%, 524 km/h at 52% and 562 km/h from 56% to 59%, which is the number the HUD holds for the last second of flight. The clock reads 10.4 seconds when the car leaves the road and 13.2 when it is drifting again, so the leap is roughly 2.7 seconds long and covers about 17% of the track, more than any other single moment on the lap.
The landing and the three drifts
The landing and the three drifts
The run touches down around 61% reading 466 km/h and spends the next 20% sideways. Small corrections of 7 and 10 metres between 61% and 66% keep it near 470 km/h, then the real work starts: a 35-metre drift from 68% to 71% takes it from 471 to 423 km/h, a 31-metre drift to 74% drops it to 403 km/h, and a 76-metre drift from 75% to 81% finishes at 362 km/h. That is 110 km/h surrendered through a corner lined with purple Gauntlet banners and barriers, and it is the slowest the reference car gets after the launch. Every metre of slide here refills nitro, and every metre past what the corner needs costs the finish.
The shockwave sprint to the rail yard
The shockwave sprint to the rail yard
The nitro shockwave fires at 82% reading 369 km/h, and the rest of the lap is spent on what it buys. The reference run reads 384 km/h at 84%, 410 km/h at 87% and 429 km/h at 88%, holds that to 90%, then 428 km/h at 93% as it passes an excavator and a FINISH sign on the right. The road turns to dirt and the speed drifts down: 394 km/h at 96%, 387 km/h at 97%, 382 km/h at 99% and 377 km/h across the line beside the rail tracks, with 19.466 on the clock. Nothing here needs steering; the shockwave at 82% decides how fast the last fifth of the lap goes.
Where the run is won
- The tunnel straight. From 2% to 41% the reference run only accelerates, from 141 km/h to 402 km/h, and the first nitro at 15% is what lifts it from 275 to 300 km/h and onwards to 400 by the exit. The speed at the exit is the speed the car carries into a 2.7-second leap that covers 17% of the track.
- How much the landing drifts cost. The three slides between 68% and 81% take the reference car from 471 km/h to 362 km/h, and the shockwave at 82% fires off whatever is left. A drift held past what the corner needs arrives at the shockwave slower and crosses the line slower.
What wrecks a run
- Firing nitro too early in the tunnel. The reference run waits until 275 km/h at 15% before its first nitro, by which point the bar is full and the car is moving fast enough to make the 300 km/h jump stick. Burning it off the line at 60 km/h spends the same bar for less.
- Scrubbing the exit drift. The 41-metre drift from 37% to 41% costs the reference run nothing, 397 km/h in and 402 km/h out, because it is a wide curve taken at full throttle. Turn in hard and the car leaves the ramp at 43% slower, and every number in the air drops with it.
- Overdriving the corner after the landing. The three drifts from 68% to 81% read 35, 31 and 76 metres and strip 110 km/h. Holding the 76-metre slide longer refills nothing the shockwave at 82% can use and only lowers the 429 km/h the run reaches at 88%.
- Clipping the obstacles side-on. The run destroys two breakables at 22% squarely at 342 km/h. Take them at an angle and the long straight that only ever adds speed starts subtracting it.
Which car to bring
Read this track the way our car stats guide suggests: count the places the layout forces you to slow down, then look at what it gives you back. The Tunnel forces it twice (the standing start and the three drifts after the landing) and in return hands you a 40-percent straight and a 2.7-second leap during which the game reads the car at 562 km/h whatever its top speed rating says.
In priority order: top speed and acceleration together, because the tunnel is nearly six seconds of flat-out running where the reference car is still gaining speed when it sees daylight, so a higher ceiling and a quicker climb both show up directly on the clock. Nitro next, because the first nitro at 15% and the shockwave at 82% are the two moments that lift the trace, and a car with a fast-filling bar fires both earlier. Drift third, for the 76-metre slide between 75% and 81%, where a car that drifts without bleeding speed arrives at the shockwave faster. Handling matters least: the only corners are a wide exit curve and one banner-lined bend after the landing, neither taken at a speed that punishes a stiff car.
The cited runs are the clearest evidence for that ordering. Four different Class S cars post laps between 19.433 and 19.999 on this track, a spread of just over half a second, and the fastest two are a Czinger 21C and a Koenigsegg Gemera, both cars with a very high ceiling and strong nitro. On a lap that is 40% straight line, that is the profile that wins.
One consequence worth being straight about. Your Gauntlet division is set by the combined rank of your top five cars, and rank leans heavily on top speed, so the cars that suit this track are the ones that push your division up. The times attached to some picks are laps other players have posted, included so you can tell whether your own run is close. They are not targets, and none of them is a time we set.
Hyundai IONIQ 5 N
StarterClass D · Gauntlet Market, Division I
The cheapest car in the Gauntlet Market and the usual way into the mode at all. Its low rank keeps your division down, and its electric acceleration covers the standing start, which is the one part of this lap where a slow car is truly exposed. It will not get near the reference run's 402 km/h at the tunnel exit, so expect the straight to feel long, but the leap and the shockwave work the same at any class.
Aston Martin DBS 770 Ultimate
StarterClass B · Gauntlet Market, Division II (900 blueprints)
The cheaper of the Division II market cars and a sensible first blueprint target if you are past the IONIQ. On this track the step up buys a higher ceiling for the six seconds underground, which is exactly where a Class B car pulls a gap on a Class D one. Learn where the exit drift starts and where the landing comes down in it before spending on anything faster.
Lamborghini SC18
MidClass A · Gauntlet Market, Division III (2,100 blueprints)
A lot of nitro for a Class A car, which matters here because the two nitro moments at 15% and 82% are the ones that lift the speed trace. A car that fills the bar quickly off the line fires the tunnel nitro earlier, and one that refills through the 76-metre drift fires the shockwave sooner after the landing. The right mid-tier car for learning the lap.
FV Frangivento Sorpasso GT3
MidClass S · Gauntlet Market, Division IV (2,200 blueprints)
The cheaper of the two blueprint cars in the Division IV market, and the step where the tunnel straight stops being a handicap. A reasonable target if you are grinding Gauntlet currency and want a Class S ceiling without saving for the Division V roster, on a track where the ceiling is worth more than on almost any other 30-second variation.
Ultima RS
HighReference run: 19.999 — Z.R.9 reference run
The slowest of the four cited runs, posted by its uploader as a Gauntlet reference lap. Just over half a second behind the fastest lap, which on a track with a 40-percent straight is a fair measure of how much a lower ceiling costs when the car is still accelerating at the exit.
Rimac Nevera Time Attack
HighRank 4,532 in the cited run
Reference run: 19.733 — Rival reference run (3-track test, chapter at 0:48)
An electric car with instant acceleration off the standing start, and the uploader's own description calls it the car to use when you do not have enough others. It gives up three tenths to the Gemera, almost all of it in the tunnel, where a lower ceiling means the car is further from 400 km/h when the exit drift starts. A good illustration of how this layout trades acceleration for top speed.
Koenigsegg Gemera
HighRank 5,041 in the cited run · Not sold in the Gauntlet Market
Reference run: 19.466 — Rival reference run
The car this entire guide was read from. A four-seat hybrid with a very high ceiling, and the run shows exactly where that pays: 141 km/h at 2% to 402 km/h at 41% without the speed ever dropping, 562 km/h in the air, and 429 km/h out of the shockwave at 88%. The uploader notes a wall touch at 26% that the speed trace barely registers, which says as much about the track as the car.
Czinger 21C
HighRank 5,001 in the cited run · Not sold in the Gauntlet Market
Reference run: 19.433 — Rival reference run
The fastest of the four cited runs by three hundredths over the Gemera, and the uploader ran it down both tunnel bores to show there is no difference between the left and right routes. A hypercar built for exactly this kind of lap: a long straight where a high ceiling and a hard-hitting nitro both count, followed by a leap where the HUD reads the car at the same 562 km/h whatever it is rated at.
These are examples of the profile, not a ranked list. The method behind them is in how Asphalt Legends car stats actually work.
Frequently Asked Questions
- How long is The Tunnel in Asphalt Legends?
- It is one of the two 30-second (30") San Francisco variations used in Gauntlet, alongside Railroad Bustle. The reference runs we cite finish it in 19.433 to 19.999 seconds, and about 40% of that lap is spent inside the tunnel.
- Does it matter which side of the tunnel you take?
- No. The uploader of the fastest cited run drove both bores side by side and states there is no difference between the left and right tunnel routes. Pick whichever keeps your line straightest into the exit drift at 37%.
- Where is The Tunnel won and lost?
- In the tunnel and at the landing. The reference run goes from 141 km/h at 2% to 402 km/h at 41% without the speed ever dropping, and that exit speed is what it carries into the leap. After touching down at 61% it then gives back 110 km/h through three drifts before the shockwave at 82%, so a run that drifts cheaply there crosses the line faster.
- What kind of car is best for The Tunnel?
- Top speed and acceleration first, nitro second, drift third. The tunnel is nearly six seconds of flat-out running where the reference car is still gaining speed at the exit, so a higher ceiling shows up directly on the clock. The two fastest cited runs were set in a Czinger 21C and a Koenigsegg Gemera, both high-ceiling hypercars with strong nitro.
- How long is the jump on The Tunnel?
- The reference run leaves the road at 43% with the clock reading 10.4 seconds and is drifting again at 61% with the clock at 13.2, so roughly 2.7 seconds in the air covering about 17% of the track. The HUD reads 562 km/h for the last second of flight.
- How many drifts are there on The Tunnel?
- One at the tunnel exit and three after the landing in the reference run: 41 metres from 37% to 41%, then 35 metres from 68% to 71%, 31 metres to 74% and 76 metres from 75% to 81%. The exit drift costs nothing; the three after the landing cost 110 km/h between them.
- Can you get a good time on The Tunnel with an earnable car?
- The Gauntlet Market ladder is the route: the Hyundai IONIQ 5 N at Division I, the Aston Martin DBS 770 Ultimate at Division II, the Lamborghini SC18 at Division III and the FV Frangivento Sorpasso GT3 at Division IV. On this track each rung buys a higher ceiling for the six seconds underground, which is worth more here than on almost any other 30-second variation.
Sources
- Asphalt Wiki - San Francisco (track variants and route maps)
- Asphalt Wiki - Gauntlet (format, divisions, Gauntlet Market)
- Reference run - Koenigsegg Gemera, 19.466 (Rival)
- Reference run - Czinger 21C, 19.433 (Rival)
- Reference run - Rimac Nevera Time Attack, 19.733 (Rival, chapter at 0:48)
- Reference run - Ultima RS, 19.999 (Z.R.9)