
Vineyard Voyage Track Guide: Asphalt Legends Gauntlet (Tuscany)
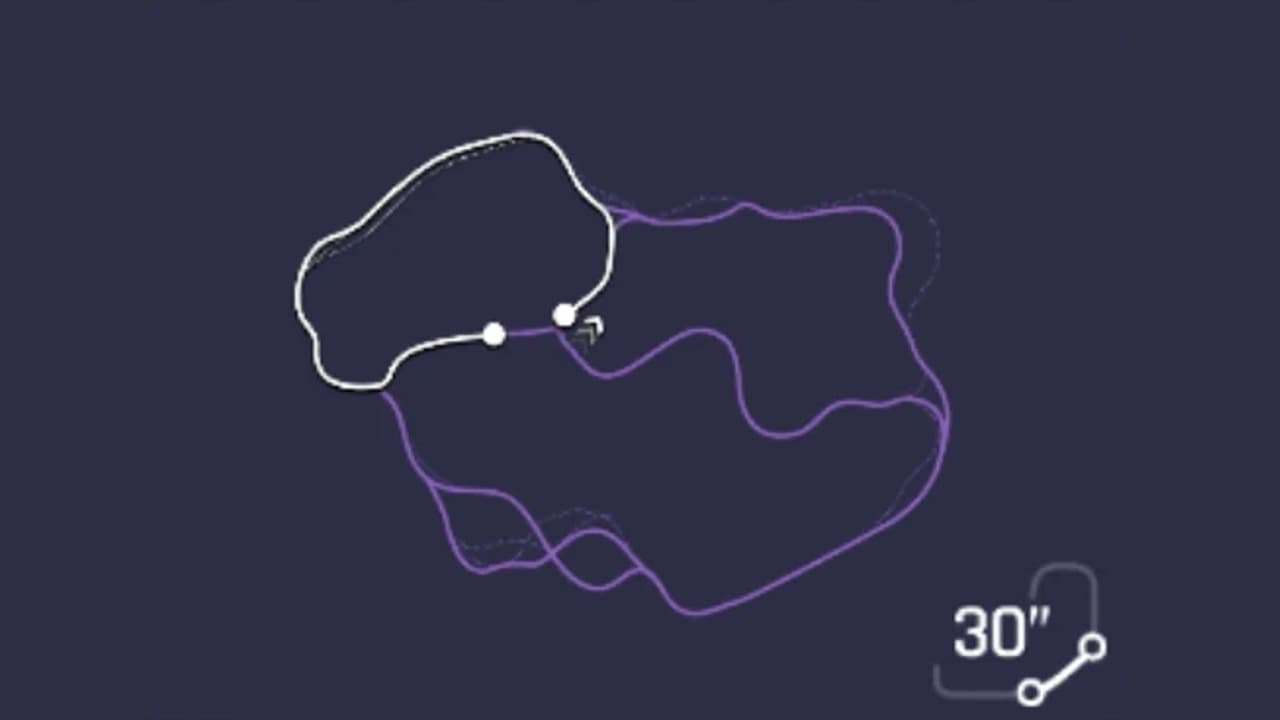 1 Nitro: Standing start, inside the wine cellar2 Nitro: Nitro chain to the cellar exit3 Hazard: Estate roads: traffic and barriers4 Drift: The long drift past the farmhouse5 Ramp: The crest jump onto the gravel straight6 Drift: The closing right-hander to the line
- 1. Standing start, inside the wine cellar
- 2. Nitro chain to the cellar exit
- 3. Estate roads: traffic and barriers
- 4. The long drift past the farmhouse
- 5. The crest jump onto the gravel straight
- 6. The closing right-hander to the line
What this track demands
The lap is decided in the back half. The crest jump at marker 5 drops you onto the fastest stretch in the Tuscany rotation, and what you carry onto it out of the long drift is worth more than anything you do in the cellar.
- Top speed
- 5
- Nitro
- 5
- Acceleration
- 4
- Handling
- 4
- Drift
- 4
- Air and stunts
- 3
The 30 seconds, beat by beat
The standing start, inside the cellar
Standing start, inside the wine cellar
Vineyard Voyage does not start on a road. You launch from a dead stop inside the wine cellar under the estate, a low stone corridor lined with barrels, and the opening is genuinely slow: the reference run is only doing 127 km/h two seconds in, with 2% of the track behind it. There is no nitro to manage yet and nowhere to go but straight, so the launch itself is the whole beat. Get it clean, because the cellar is the one stretch on this lap where there is no way to make the time back later.
Spend the first nitro in the corridor
Nitro chain to the cellar exit
The enclosed section is where the lap's first nitro goes in. The reference run chains bottles through the cellar and climbs from 219 km/h at 7% to 290 km/h by the time daylight appears around 15%. Spend here rather than hoarding. The corridor is narrow and dead straight, which makes it the cheapest place on the track to turn nitro into distance, and the bar refills across the open roads that follow. Arriving at the exit slow is what costs you the back half, not the bar you emptied getting there.
Estate roads, and the only traffic on the lap
Estate roads: traffic and barriers
Out of the cellar the track opens onto the estate approach roads, and this is the one part of the run with civilian traffic on it. The reference run threads past a car and a run of roadside barriers between 13% and 21%, holding a steady 275 to 308 km/h, then builds to 403 km/h by 33%. None of it is technical, but all of it is narrow enough to punish a mistake at that speed. Treat it as a recovery stretch: rebuild the bar, stay off the barriers, and line up the corner that follows.
The long drift, and the biggest loss on the lap
The long drift past the farmhouse
From about 35% the road turns into a long, dusty left-hander past a farmhouse, and the reference run spends four full seconds sideways through it: 425 km/h going in, down to 382 km/h at 45%, still only 399 km/h at 48%. That is the largest single speed loss on the track and there is no line that avoids it. The question is only how much you hand back. The payoff is a full nitro bar, and the section immediately after is the fastest part of the lap, so a tidy exit here is worth considerably more than a fast entry.
The crest jump onto the gravel straight
The crest jump onto the gravel straight
This is the lap. The track climbs, crests and throws you into the air a little under two thirds in: the reference run is airborne from roughly 61% to 65%, touches down around 69% at 502 km/h, and then accelerates to 561 km/h across the gravel straight by 73%. That is the fastest the car goes all run, and it holds over 550 km/h to 82%. Land pointed straight down the road. Everything banked in the drift gets spent here, and a crooked landing is the one reliable way to waste it.
The closing right-hander gives it back
The closing right-hander to the line
The last tenth of the track hands the speed back. From about 87% the road tightens into a right-hander running along a stone wall, and the reference run falls from 554 km/h to 399 km/h before crossing the line at 417 km/h. There is no way to take it flat, so the job is to lose as little as possible and stay off the wall. A car that arrives here carrying more speed off the gravel straight still finishes ahead, even when both runs scrub the same amount through the corner itself.
Where the run is won
- What you carry off the crest jump at marker 5. The reference run peaks at 561 km/h on the gravel straight that follows it, and that is the only place on this lap where a fast car is allowed to be fast.
- A tidy exit from the long drift at marker 4. Four seconds sideways is the biggest single loss on the track, and your exit speed there sets up everything after it.
What wrecks a run
- Hoarding nitro through the cellar. The corridor is straight and narrow, which makes it the cheapest place on the lap to convert nitro into distance, and the bar rebuilds on the open roads afterwards.
- Fighting the drift at 35 to 48% instead of riding it. The corner cannot be taken flat, and scrubbing extra speed there costs you the gravel straight as well as the corner.
- Landing crooked off the crest at marker 5. The fastest stretch of the lap starts the moment you touch down, and a car that lands sideways spends it correcting instead of accelerating.
- Carrying too much into the closing right-hander. It drops the reference run from 554 to 399 km/h regardless, and the stone wall is close enough that overcooking it ends the run rather than costing a tenth.
Which car to bring
Read this track the way our car stats guide suggests: count the places the layout forces you to slow down, then look at what it gives you back. Vineyard Voyage forces it three times (the standing start in the cellar, the long drift at marker 4, the closing right-hander at marker 6) and in between it hands you the fastest sustained stretch in the Tuscany rotation, over 550 km/h from 73% to 82%.
That makes it close to the mirror image of its sibling variation, Riverine Launch. In priority order here: top speed first, because the back half is long, open and gravel-surfaced, and a car that tops out lower simply stops gaining while a faster one is still pulling. Nitro efficiency second, because the cellar and the gravel straight are both run lit. Drift retention third, since the two drift zones are where the bar is refilled. Acceleration is the stat you can compromise on: the standing start is over inside the first 7% of the track, which is the opposite of the advice we give for Riverine Launch.
One consequence worth being straight about. Your Gauntlet division is set by the combined rank of your top five cars, and rank leans heavily on top speed, so on Riverine Launch you can pick a low-rank car that suits the track and quietly keep your division down. You cannot do that here. This track genuinely wants top speed, so the car that suits it is also the car that pushes your combined rank up. Plan the trade rather than discovering it.
The good news is that most of the list below is earnable rather than bought. The Gauntlet Market sells cars for currency the mode itself pays out, and it stocks a top-speed car in almost every division, including the fastest car in any reference run we could find for this track. The times attached to some picks are laps other players have posted, included so you can tell whether your own run is close. They are not targets, and none of them is a time we set.
Hyundai IONIQ 5 N
StarterClass D · Gauntlet Market, Division I
The cheapest car in the Gauntlet Market and the usual way into the mode at all, but be clear about what it is doing here. Its strength is acceleration and low rank, which is exactly the profile Riverine Launch rewards and close to the one this track does not. It will get you round; it will not get you a competitive time on a lap decided at 550 km/h.
Aston Martin DBS 770 Ultimate
StarterClass B · Gauntlet Market, Division II (900 blueprints)
The first rung where top speed starts to matter more than rank. Worth naming because the Division II market is reachable early and this is the cheaper of its blueprint cars, which makes it a sensible place to put Gauntlet currency while you are saving for a Division III or IV car.
Lamborghini SC18
MidClass A · Gauntlet Market, Division III (2,100 blueprints)
Maxed, it runs a nitro rating of 78.79 against a top speed of 370.2, which is a lot of nitro for a Class A car. That suits the two places this lap is actually run lit, the cellar and the gravel straight. The modest top speed is the ceiling: it is the right mid-tier car for learning the lap, and the thing you will eventually outgrow on it.
FV Frangivento Sorpasso GT3
MidClass S · Gauntlet Market, Division IV (2,200 blueprints)
The cheaper of the two blueprint cars in the Division IV market, and the step where the back half of this track starts to open up. A reasonable target if you are grinding Gauntlet currency and want a Class S car without saving for the Division V roster.
Ultima RS
HighClass S · Gauntlet Market, Division IV (2,000 blueprints)
Reference run: 21.899 — Newbie Driver 9351 reference run
A top speed rating of 402 with above-average acceleration (75.70) and an average nitro rating (47.09). The top speed is what earns it a place here, and the reference time below was set on a fully gold six-star car, which is worth knowing before you compare your own lap against it.
Koenigsegg Gemera
HighClass S · Event car, not sold in the Gauntlet Market
Reference run: 20.941 — River-OL reference run
The run this entire guide was read from, and a useful demonstration that the track rewards carrying speed rather than any one trick. The wiki is blunt that the Gemera is only realistically obtainable if you have stockpiled resources for its event, so treat it as a benchmark rather than a shopping recommendation.
Koenigsegg Jesko Absolut
HighClass S · Gauntlet Market, Division V
Reference run: 20.925 — 쿼티쿼티야.. reference run
The quickest lap we could find on this track, and the clearest evidence for what it wants: maxed, the Absolut runs a 498.9 km/h top speed for 509 km/h total with nitro, the highest figure of anything on this list. That it is a Gauntlet Market car matters too, because it means the best car for this track is earned by playing the mode rather than pulled from a pack.
These are examples of the profile, not a ranked list. The method behind them is in how Asphalt Legends car stats actually work.
Frequently Asked Questions
- How long is Vineyard Voyage in Asphalt Legends?
- It is one of the two 30-second (30") Tuscany variations used in Gauntlet, alongside Riverine Launch. Competitive reference runs finish it in roughly 20.9 to 21.9 seconds depending on the car. It is not available in Career mode.
- Where is Vineyard Voyage won and lost?
- On the crest jump about two thirds in and the gravel straight after it. A reference run touches down around 69% of the way through at 502 km/h and accelerates to 561 km/h by 73%, holding over 550 km/h until 82%. Nothing else on the lap moves the clock as much.
- What kind of car is best for Vineyard Voyage?
- Top speed first, then nitro efficiency, then drift retention. Acceleration matters least, because the standing start is over inside the first 7% of the track. This is the opposite of the advice for Riverine Launch, the other 30-second Tuscany variant, which is an acceleration track.
- How is Vineyard Voyage different from Riverine Launch?
- They are near mirror images. Riverine Launch starts in a riverbed and is decided by what you carry into a ramp about a third of the way in, which makes acceleration and nitro the stats that matter. Vineyard Voyage starts in a wine cellar, gets its speed much later, and is decided on a long gravel straight in the back half, which makes top speed the stat that matters.
- Can you get a good Vineyard Voyage time with an earnable car?
- Yes, and unusually the best car we found is one. The fastest reference run on this track, a 20.925 in a Koenigsegg Jesko Absolut, uses a car sold in the Gauntlet Market at Division V, which is bought with currency the mode itself pays out. The Ultima RS at Division IV and the Lamborghini SC18 at Division III are cheaper rungs on the same ladder.
- Why does this track push my Gauntlet division up?
- Your division is set by the combined rank of your top five cars, and rank leans heavily on top speed. On some tracks you can pick a low-rank car that still suits the layout and keep your division down. Vineyard Voyage genuinely rewards top speed, so the car that suits it is also the car that raises your combined rank. It is a real trade-off rather than something you can optimise around.
- Do you have to drift the corner at the farmhouse?
- Yes. From about 35% the road turns into a long left-hander that cannot be taken flat, and the reference run spends four seconds sideways through it, falling from 425 km/h to 382 km/h. The drift refills nitro, so the aim is a clean exit rather than avoiding it.
Sources
- Asphalt Wiki — Tuscany (track variants and route maps)
- Asphalt Wiki — Gauntlet (format, divisions, Gauntlet Market)
- Reference run — Koenigsegg Gemera, 20.941 (River-OL)
- Reference run — Koenigsegg Jesko Absolut, 20.925 (쿼티쿼티야..)
- Reference run — Ultima RS, 21.899 (Newbie Driver 9351)
- Asphalt Wiki — Koenigsegg Jesko Absolut stats
- Asphalt Wiki — Lamborghini SC18 stats
- Asphalt Wiki — Ultima RS