
Railroad Bustle Track Guide: Asphalt Legends Gauntlet (San Francisco)
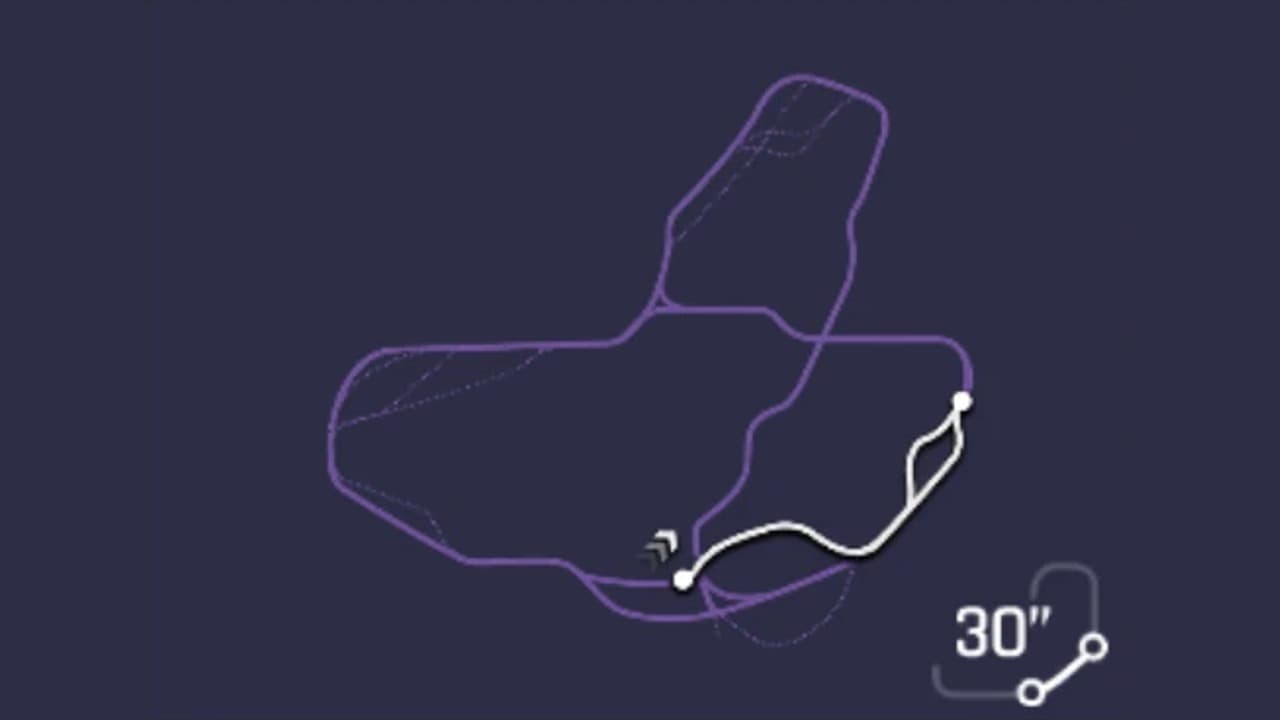 1 Hazard: Standing start past the hydrants and barriers2 Drift: The 63-metre drift and the first shockwave3 Nitro: The rail-yard straight and the 84-metre drift4 Drift: The 115-metre drift between the trains5 Nitro: The second shockwave, the hop and the truss bridge6 Ramp: The 2.18-second leap into the finish gate
- 1. Standing start past the hydrants and barriers
- 2. The 63-metre drift and the first shockwave
- 3. The rail-yard straight and the 84-metre drift
- 4. The 115-metre drift between the trains
- 5. The second shockwave, the hop and the truss bridge
- 6. The 2.18-second leap into the finish gate
What this track demands
The lap is three drifts of 63, 84 and 115 metres that keep the nitro bar full for two shockwaves, and the second shockwave sets the speed for everything after it: the hop, the bridge and the 2.18-second leap that lands 11% from the line. What decides it is how much speed the drifts cost and how early each shockwave fires.
- Acceleration
- 4
- Nitro
- 4
- Drift
- 4
- Top speed
- 3
- Handling
- 3
- Air and stunts
- 3
The 30 seconds, beat by beat
The standing start past the hydrants and barriers
Standing start past the hydrants and barriers
Railroad Bustle launches from a dead stop on a paved lot beside the rail yard, with red and white barriers down the left and a row of fire hydrants along the road. The reference run reads 57 km/h half a second in with 0% of the track behind it, 133 km/h at 1% and 190 km/h at 4% with the nitro already lit. The hydrants are the first thing the lap asks for: the run punches through them at 6% and 198 km/h with two obstacles on the counter, then reads 235 km/h at 9% as a construction site with a bulldozer comes up on the left. Nothing here needs steering, only a clean launch and a straight line through the breakables.
The 63-metre drift and the first shockwave
The 63-metre drift and the first shockwave
At 10% the lot bends left and the reference run starts its first drift at 247 km/h: 24 metres by 11%, 50 metres by 13% with two more barriers destroyed on the way through, and 63 metres by 15% at 252 km/h. The slide costs almost nothing, because the run is still accelerating out of the launch, and it fills the bar for the first nitro shockwave, which fires at 17% at 283 km/h. From there the speed climbs to 323 km/h at 18% and 376 km/h at 23% as the road drops onto the rail tracks. That 376 is the speed the car carries through the whole of the next section.
The rail-yard straight and the 84-metre drift
The rail-yard straight and the 84-metre drift
From 23% to 27% the run holds 376 km/h flat along the tracks, between parked freight cars on both sides, and a perfect nitro at 28% lifts it to 386 km/h. It is the only place on the lap where a top-speed ceiling would matter, and it lasts under two seconds. At 33% the tracks curve and the second drift begins at 373 km/h: 31 metres by 34%, 79 metres by 37% at 344 km/h and 84 metres by 39%, where the run breaks two more obstacles at 355 km/h. It is back to 375 km/h at 40%. The drift trades about 40 km/h for a full bar, and the run takes that trade.
The 115-metre drift between the trains
The 115-metre drift between the trains
The longest drift on the track starts at 42% at 373 km/h and does not end until 51%. The counter reads 32 metres at 44% and 361 km/h, 64 metres at 47% and 346 km/h, 95 metres at 50% and 331 km/h, and 115 metres at 51% at 336 km/h, all of it on the tracks with trains sliding past on either side. It is the slowest the reference run gets after the launch, and the bar it fills is spent immediately: the second nitro shockwave fires at 55% at 362 km/h and the run reads 379 km/h at 58% with a Perfect Run on the HUD. Overdrive this slide and you arrive at the shockwave with speed you cannot get back.
The second shockwave, the hop and the truss bridge
The second shockwave, the hop and the truss bridge
The shockwave at 55% is the one that sets up the finish. Out of it the run reads 421 km/h at 61% and 425 km/h at 62%, then the road lifts into a short hop that puts the car in the air for under a second and pushes the reading to 491 km/h at 66%. The landing at 68% reads 486 km/h, and the run is under a steel truss bridge at 72% at 440 km/h, still on the tracks. The bridge is where the speed from the shockwave is either kept or lost: the reference car threads it at 445 km/h at 73% with the nose straight, which is the entry for the leap.
The 2.18-second leap into the finish gate
The 2.18-second leap into the finish gate
At 77% the tracks end in a ramp and the car leaves the ground reading 512 km/h, the number it holds for the whole of the leap. The reference run throws two barrel rolls between 77% and 85% and the air-time counter reaches 2.18 seconds before touchdown around 89%, where the reading drops to 478 km/h and then 455 km/h at 92%. The last stretch is a finish gate with breakable barriers across it: three obstacles destroyed at 95% at 385 km/h, 376 km/h through the gate, and 17.299 on the clock at 99%. The leap lands so close to the line that a crooked landing has no room to recover.
Where the run is won
- The two shockwaves. The first lifts the reference run from 283 km/h at 17% to 376 km/h at 23%, and the second from 362 km/h at 55% to 512 km/h in the air at 77%. Everything the car does between them, three drifts totalling 262 metres, is there to keep the bar full for those two moments.
- How much the drifts cost. The 115-metre slide between 42% and 51% takes the run from 373 km/h down to 331 km/h, and the second shockwave fires off whatever is left. A drift held past what the corner needs arrives at 55% slower and leaves the ground at 77% slower.
What wrecks a run
- Sliding past the bar. The three drift zones read 63, 84 and 115 metres in the reference run, and each ends the moment the bar is full. Holding the 115-metre drift longer only scrubs the entry speed for the shockwave at 55%.
- Firing the second shockwave late. The reference run spends it on the ground at 55%, which is what turns 362 km/h into 425 km/h at the hop. Fired in the air over the hop it changes nothing, because the game already reads the car at 491 km/h.
- Landing the leap crooked. The car touches down around 89% at 478 km/h with only 11% of the track left, and the finish gate barriers at 95% are the next thing it hits. A sideways landing turns 376 km/h through the gate into a wall.
- Clipping the hydrants and barriers side-on. The run destroys two obstacles at 6%, two more inside the first drift and two more at 39%, all of them square. Take one at an angle in the launch and the whole first drift starts slower.
Which car to bring
Read this track the way our car stats guide suggests: count the places the layout forces you to slow down, then look at what it gives you back. Railroad Bustle forces it four times (the standing start, and three drifts that cost 20 to 40 km/h each) and in return it hands you two shockwaves, a hop and a 2.18-second leap, during which the game reads the car at 512 km/h whatever its top speed rating says.
In priority order: nitro first, because the two shockwaves are the moments that set the lap, and a car with a fast-filling, powerful nitro gets to fire both of them early. Drift second, because 262 metres of the run are spent sideways and a car that drifts without bleeding speed arrives at each shockwave faster. Acceleration third, for the standing start and for the recovery out of each slide. Top speed matters least: the only flat-out stretch is the 376 km/h straight between 23% and 28%, and it lasts under two seconds before the next drift begins. Handling sits in the middle, because the run threads hydrants, barriers and a truss bridge, but none of them at a speed that punishes a stiff car.
The cited runs are the clearest evidence for that ordering. Five different Class S cars post laps between 17.299 and 18.299 on this track, a spread of one second, and the fastest of them, the SF90 Stradale, is a hybrid built around a strong nitro rather than an outright top-speed car. On a lap with two shockwaves and no long straight, that is the profile that wins.
One consequence worth being straight about. Your Gauntlet division is set by the combined rank of your top five cars, and rank leans heavily on top speed, so a car with a modest top-speed rating and a good nitro suits Railroad Bustle and keeps your division down at the same time. The times attached to some picks are laps other players have posted, included so you can tell whether your own run is close. They are not targets, and none of them is a time we set.
Hyundai IONIQ 5 N
StarterClass D · Gauntlet Market, Division I
The cheapest car in the Gauntlet Market and the usual way into the mode at all. Its low rank keeps your division down and its acceleration covers the standing start, which is the one part of this lap where a slow car is truly exposed. It will not reach the reference run's 376 km/h on the rail-yard straight, but the drifts and the two shockwaves work the same at any class.
Aston Martin DBS 770 Ultimate
StarterClass B · Gauntlet Market, Division II (900 blueprints)
The cheaper of the Division II market cars and a sensible first blueprint target if you are past the IONIQ. On this track the step up buys a quicker launch and a faster straight between 23% and 28%, which is where a Class B car pulls a gap on a Class D one. Learn the three drift lengths in it before spending on anything faster.
Lamborghini SC18
MidClass A · Gauntlet Market, Division III (2,100 blueprints)
A lot of nitro for a Class A car, which is the stat this track rewards most: two shockwaves set the lap, and a car that refills quickly out of the 63-metre and 84-metre drifts fires them earlier. The right mid-tier car for learning where the hop at 62% and the leap at 77% actually put you, and one that keeps the Division III roster within reach.
FV Frangivento Sorpasso GT3
MidClass S · Gauntlet Market, Division IV (2,200 blueprints)
The cheaper of the two blueprint cars in the Division IV market, and the step where the straight between 23% and 28% stops being a handicap. A reasonable target if you are grinding Gauntlet currency and want a Class S car without saving for the Division V roster, on a track where Class S mostly buys you the launch and the two seconds on the tracks.
Vanda Electrics Dendrobium D-1
HighClass S · Special events and card packs, not sold in the Gauntlet Market
Reference run: 18.299 — Raidee reference run
The slowest of the five cited Class S runs, but within a second of the fastest, which is the point: an electric car with instant acceleration off the standing start and out of each drift closes most of the gap on this layout. A good example of how little the top-speed ceiling matters here.
Bugatti Centodieci
HighClass S · Special events and card packs, not sold in the Gauntlet Market
Reference run: 18.266 — ROKAA_Minu reference run
The heavier Bugatti of the two cited, and its lap sits three hundredths clear of the Dendrobium. A car with this much straight-line pace only gets to use it between 23% and 28% on Railroad Bustle, so the time it posts is mostly a measure of how cleanly it takes the three drifts and lands the leap.
Bugatti Chiron Pur Sport
HighClass S · Special events and card packs, not sold in the Gauntlet Market
Reference run: 18.066 — QuanTheAznPoop reference run
The track-focused Chiron, and two tenths quicker here than the Centodieci in the cited runs. The same channel posted it alongside a Double Roundabout lap, and on this track the gain shows up in the drifts rather than the straight: a car that slides without shedding as much speed arrives at both shockwaves faster.
W Motors Lykan HyperSport
HighClass S · Event and pack car, not sold in the Gauntlet Market
Reference run: 17.766 — ICBM reference run
The second-fastest cited run, and an EVO-tuned car in that lap. The Lykan's nitro is the reason it suits this layout: two shockwaves and a hop decide Railroad Bustle, and a car that fills the bar quickly out of the 63-metre drift fires the first one earlier than 17%. Half a second behind the SF90 on a lap this short is a small gap.
Ferrari SF90 Stradale
HighClass S · Special events and card packs, not sold in the Gauntlet Market
Reference run: 17.299 — SS SNAKE EYES reference run
The car this entire guide was read from, and the fastest of the five cited runs. A hybrid Class S car whose strength is its nitro rather than its ceiling, and the run shows exactly where that pays: 283 to 376 km/h off the first shockwave, 362 to 512 km/h off the second, and a 2.18-second leap with two barrel rolls that lands 11% from the line. On a track with no real straight, that profile beats the outright fast cars.
These are examples of the profile, not a ranked list. The method behind them is in how Asphalt Legends car stats actually work.
Frequently Asked Questions
- How long is Railroad Bustle in Asphalt Legends?
- It is one of the two 30-second (30") San Francisco variations used in Gauntlet, alongside The Tunnel. The reference runs we cite finish it in 17.299 to 18.299 seconds, and about 262 metres of that lap are spent drifting.
- Where is Railroad Bustle won and lost?
- At the two nitro shockwaves and in the drifts that feed them. The reference run fires the first at 17% and goes from 283 to 376 km/h, and the second at 55% and goes from 362 to 512 km/h in the air. The three drifts between them cost 20 to 40 km/h each, so a slide held longer than the bar needs arrives at the next shockwave slower.
- What kind of car is best for Railroad Bustle?
- Nitro first, drift second, acceleration third. Top speed matters least: the only flat-out stretch is the 376 km/h straight between 23% and 28%, and it lasts under two seconds. The fastest cited run was set in a Ferrari SF90 Stradale, a hybrid Class S car whose strength is its nitro rather than its ceiling.
- How many drifts are there on Railroad Bustle?
- Three in the reference run: 63 metres from 10% to 15%, 84 metres from 33% to 39%, and 115 metres from 42% to 51%. Each one ends when the bar is full, and each is followed by nitro. The 115-metre slide is the slowest point of the lap after the launch, at 331 km/h.
- Do you have to do the barrel rolls on the Railroad Bustle leap?
- No. The reference run throws two between 77% and 85% during its 2.18 seconds of air, and each one refills nitro, but the rolls are a choice and landing straight is not. The leap touches down around 89% with only 11% of the track left and the finish gate barriers at 95%, so a roll that is still going at touchdown costs the whole finish.
- Can you get a good Railroad Bustle time with an earnable car?
- The Gauntlet Market ladder is the route: the Hyundai IONIQ 5 N at Division I, the Aston Martin DBS 770 Ultimate at Division II, the Lamborghini SC18 at Division III and the FV Frangivento Sorpasso GT3 at Division IV. On this track the step up each rung mostly buys you the launch and the two seconds on the rail-yard straight; the drifts and shockwaves work the same at any class.
- Is Railroad Bustle a drift track or a nitro track?
- Both, and they depend on each other. The three drifts fill the bar, the two shockwaves spend it, and the second shockwave is what carries the car over the hop, under the bridge and into the leap at 512 km/h. A car that drifts cheaply and fills nitro quickly is the one this layout rewards.
Sources
- Asphalt Wiki - San Francisco (track variants and route maps)
- Asphalt Wiki - Gauntlet (format, divisions, Gauntlet Market)
- Reference run - Ferrari SF90 Stradale, 17.299 (SS SNAKE EYES)
- Reference run - W Motors Lykan HyperSport, 17.766 (ICBM)
- Reference run - Bugatti Chiron Pur Sport, 18.066 (QuanTheAznPoop)
- Reference run - Bugatti Centodieci, 18.266 (ROKAA_Minu)
- Reference run - Vanda Electrics Dendrobium D-1, 18.299 (Raidee)